| 8. Textures
|
|
Applying the texture
When you finished setting up the texture the way you want it, you can apply
it to your object by clicking on the Paint Object icon on the left side of the
Material Editor.
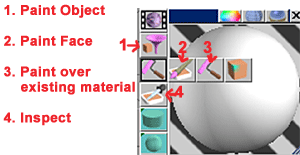
You can also apply the material to selected faces only. To do this, first
select the faces you want to texture, then click on the icon underneath the
Paint Object tool and hold down the mouse button, then navigate to the Paint
Face icon. Once you clicked on the Paint Face icon, trueSpace will paint the
selected faces one by one. If the selected area is fairly big, it might take a
while for the program to finish painting, so be patient. Once the program
finished the painting, your cursor will change into a paintbrush and you can
click on other faces and paint those yourself. You can even change the texture,
and, as long as you have the paintbrush icon, paint as many faces with the new
texture as you want. If you want to stop painting faces, just click on the
Object Tool (the white arrow).
If you have one or two objects where you want to change the material that you
applied previously, you can do that easily by using the "Paint over
existing Material" tool. Just load the new material that you want to apply,
then click on this tool (underneath the Paint Object icon, in the same group as
the Paint Face icon), then click on the material that you want to change. This
way you can change the texture of whole objects (if they were textured with
one material only), or all the faces of an object that were painted
with the same material.
Another tool that is very useful in the Material Editor is the Inspect tool
which looks like an eyedropper. If you have several objects with different
textures in your scene and you want to get back to one of the textures and do
more editing work on it, you can select the Inspect tool then click on the
object you want. The texture of that object will be loaded in the Material
Editor, so you can make your changes and re-apply the new texture. (Fig. 8.30)
|
|
 |
|
Fig. 8.30 |
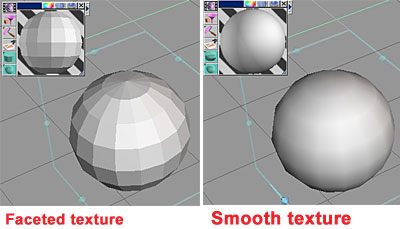
| You can also select whether you want to apply your texture Faceted, Smooth,
or to use the Auto Facet option. By default, the Auto Facet option is on, and
this works well most of the time. But, for example, if you import an object from
another program and it doesn't look smooth enough, you can try the Smooth option
and that might help. You can set the autofacet angle by right-clicking on the
Auto Facet icon. (Fig. 8.31)
|
|
|
|
Fig. 8.31 |
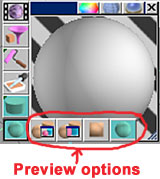
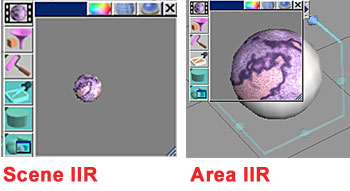
| Finally, in the last row of the icons on the left side of the Material
Editor, you can set whether you want the preview to show the texture on a
sphere, a plane, and whether you want to see the texture previewed on the object
(Area IIR) or whether you want to see a preview of the textured scene in the
Material Editor window. (Fig. 8.32) In the case of the Area IIR, position your preview
window over the object to see the texture on it. (Fig. 8.33)
|
|
|
|
|
Fig. 8.32 |
Fig. 8.33 |
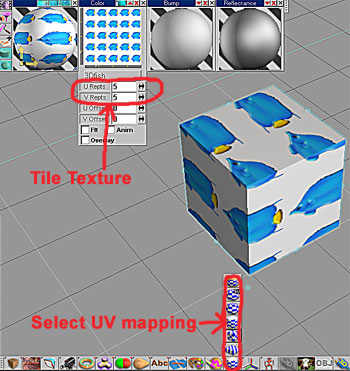
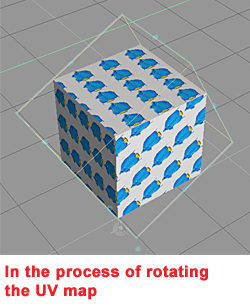
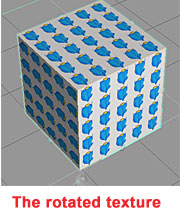
| Once
you put a texture on your object, you can change its orientation by choosing a
UV projection for it and rotating the bounding box. For example, if you have a
box, you would click on the "cubic UV projection". (Fig. 8.34) A bounding box will
be placed around your object. You can rotate this box around the object (with
the little diamonds), and the texture will rotate with it (Fig. 8.35 and Fig.
8.36). You can tile your
texture by changing the U and V Repts (Fig. 8.34).
|
 |
|
|
|
Fig. 8.34 |
Fig. 8.35 |
Fig. 8.36 |
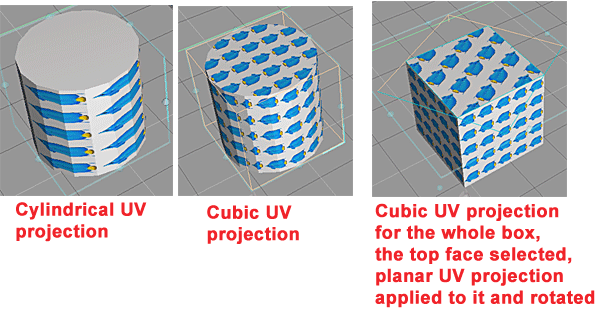
| The UV mapping you choose for your object can change how the texture is
applied (the orientation and the tiling of your pattern). You can experiment
with different UV mapping options, tiling, rotating, etc. You can also select
e.g. an individual face and apply a different UV mapping to just that face.
(Fig. 8.37) |
|
|
|
Fig. 8.37 |
|
