|
8. Textures
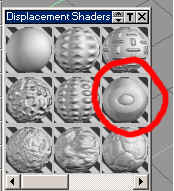
To Load a Bump Shader:
To load a bump shader, either
1. Click on the Displacement Shaders icon in the library panel
2. Or Right-click on the displacement icon in the Material Editor
3. Or Right-click inside the Bump window.
This will bring
up the Displacement Shaders library. Double-click on one of the shaders in this
library and it will be
loaded in the Material Editor. (Fig. 8.10)
|
|
 |
|
|
Fig. 8.10 |
Fig. 8.11
|
|
If you want to use a greyscale image for your bump map, click on the icon
inside the Displacement Shaders panel that looks like an eye. (Fig. 8.11)
Then, click on the little red arrow in the Bump window of the Material Editor
(if it's not open yet) to access the options for the bump shaders. Now click
inside the Bump window or click on the button titled "Caligari", and
navigate to the folder where the image file is. Double-click on it to load it
into the Bump window. You can tile this image with the U Repts and V Repts
options (enter the number or use the little arrows), and set the height of the
bump map with the Amp value.
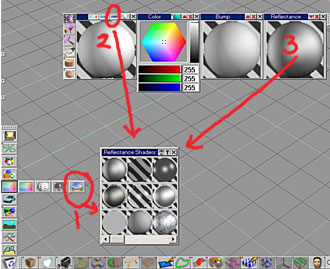
Reflectance Shaders
To load a reflectance shader, either
1. Click on the Reflectance Shaders icon in the library panel
2. Or Right-click on the reflectance icon in the Material Editor
3. Or Right-click inside the Reflectance window.
This will bring
up the Reflectance Shaders library. Double-click on one of the shaders in this
library and it will be
loaded in the Material Editor. (Fig. 8.12)
|
|
|
|
|
Fig. 8.12. |
Fig.
8.13
|
|
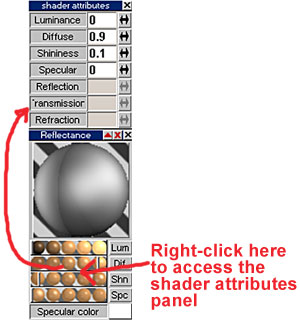
If you expand the
panel by clicking on the little red arrow, you can change the relevant values of
the chosen reflectance shader. If you want more precise, numerical control, then
right-click within this panel and you'll get another window, called shader
attributes, where you can enter the values numerically. (Fig. 8.13)
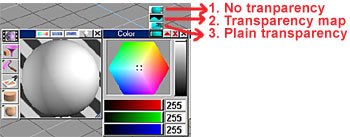
Transparency
To set the transparency of your
object, click on the Transparency icon in the Color panel and hold down the
left button of your mouse. Three choices will appear: no
transparency, plain transparency and transparency map. (Fig. 8.14)
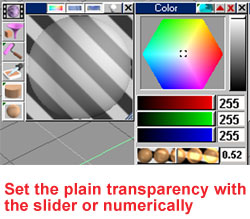
If you choose plain transparency, a little bar will appear on the bottom of the Color panel, where
you can set the amount of the transparency. The more you move the slider to the
right, the more transparent your object will be. If you click on the little red arrow
to show the parameters, you'll also be able to enter the transparency value
numerically (0-1). The lower the number, the more transparent the
object. (Fig. 8.15)
|
|
 |
|
|
Fig. 8.14 |
Fig. 8.15
|
|
If you choose the
transparency map option, a new window called "Transparency" will
appear. Click inside this window. The Transparency Map
Browser comes up. Navigate to the transparency map you want and
double-click on it. Now the transparency map is loaded. (Fig.
8.16)
|
|
 |
|
Fig. 8.16
|
| The picture above shows how the sphere with the transparency map looks
rendered.
|
|
|
|
|
Fig. 8.17 |
Fig. 8.18
|
|
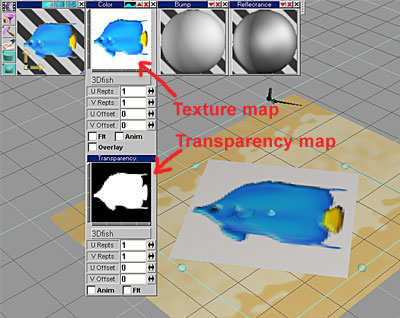
In the pictures above, I loaded a TGA file for the texture and loaded the
same image file for the transparency map. TGA files include the alpha channel
(which stores the transparency information). When you load a TGA image file for
the transparency map in trueSpace, trueSpace will extract the alpha channel (Fig. 8.17).
The black area will be transparent and the white area will be opaque when
rendered, i.e. it will show the texture from your texture map or the pattern of
the procedural shader. The rendered image is on
the right (Fig. 8.18).
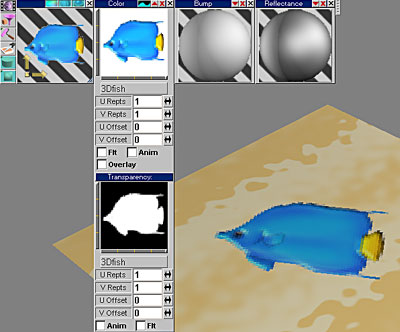
You can also use other image file formats for the texture (e.g. JPEG, BMP,
etc.), and make the transparency map by making the parts that you want
transparent black, and the parts that you want to show white, then save this
black-and-white image under a new file name. (Of course, you can also use different
shades of gray, in a transparency map, it doesn't have to be pure black and white - then the
amount of transparency will vary according to the shade of gray.) Then, load
this black-and-white image for your transparency map. If you load a color image
file (not a TGA file) for your transparency map in trueSpace, trueSpace will
automatically make it a black-and-white image. However, this image might have
gray areas, which would make the rendered texture semi-transparent.
You can also use transparency
shaders, which you can open from the library (1) or by right-clicking on the
"Transparency: none" icon in the Color panel (2) (Fig. 8.19).
|
|

|
|
Fig. 8.19 |
|
