| 12. Rendering |
|
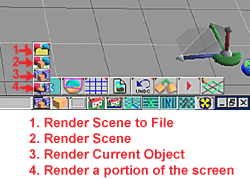
To render an object, click on it, then select "Render
Current Object".
To render an area of the scene, first click on "Render
a portion of the screen", then draw a rectangle around the area that you
want rendered.
To render the whole scene, choose "Render Scene".
These options let you see how your object or scene would
look with the lights and textures, but does not save these renders to file. To
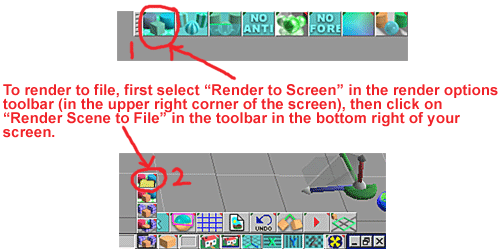
render your scene to file, first choose "Render Scene" in the render
options toolbar (right-click on the render button to open the toolbar if it's
not open yet), then choose "Render Scene to File". A window will pop
up, where you can set the file format, the resolution, the frame numbers in the
case of an animation, etc. (Fig. 12.1 and Fig. 12.2)
|
 |
|
|
Fig. 12.1 |
Fig. 12.2
|
| For an explanation about the different tools
within the render options toolbar, please see the manual. I'm just going
to list a few tips here to help you along:
- If you don't see the render options toolbar, right-click on any of
the render buttons and it should pop up.
- Click and hold on the icons within the toolbar to access more tools
and right-click on the icons to set the options for the tools.
- For your final render, set the render quality to "High" to
show the textures, shadows and transparency. For shadows to show in your
render, turn on Raycast. For reflections and/or transparency, enable
Raytrace, too.
- For volumetric lights, enable volumetric effects for the light (the
light has to be a spotlight or a projector light) and turn on
"Foreground Effects Shader - Simple Volumetric" in the rendering
options toolbar. Right-click on this icon to set the options for the
volumetric effect.
|
| 13. Layers in trueSpace 6
|
|
Layers are very useful, and they were introduced in version
6 of trueSpace. They are excellent tools for grouping objects and hide or reveal
them with one click.
Just like the other toolbars, the layers toolbar can be
minimized or expanded, and you can place it wherever you want it by clicking
on its handle and dragging it. When you start a new scene, you start out with
two buttons in the toolbar: one for the basic layer and one for adding new
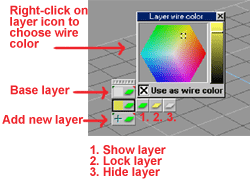
layers. If you right-click on the active layer, a window called "Layer wire
color" will pop up. Here, you can choose a color for your layer, and all
the objects on that layer will have that color in wireframe, solid outline, or
transparent outline mode. You can also uncheck the "Use as wire color"
option if you don't want your objects colored this way. (Fig. 13.1)
|
|
 |
|
|
Fig. 13.1 |
Fig. 13.2 |
|
To hide a layer, click on its button. To display it, click
on this button again. You can also lock a layer so that you can't accidentally
change it by clicking on its icon, holding down the left mouse button, and
navigating to "Lock layer". To unlock the layer, just click on
"Show layer".
To add a new layer, click on the "Add New Layer"
button. If you right-click this button, you'll get the "Layers Info"
panel, where you can set options for and read information about the layers. Here
you can name your layers, check what objects or elements are on each layer,
select which layer should be active, etc. If you enable "AutoActive",
then whenever you click on an object in your scene, that object's layer becomes
active. You can also add more layers from here, by clicking on the Add Layer
button. There is also a column of numbers on the right side: The first one
indicates the layer's number that you are on, the second shows how many layers
there are in the scene, and the third tells you how many objects and elements
there are on the active layer.
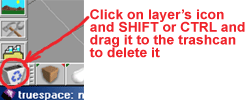
To delete a layer: CTRL or SHIFT and drag-and-drop a layer
icon to the trashcan icon in the lower left corner of the screen. This deletes
the layer's contents and the layer icon, too. (Fig. 13.2)
To merge layers: click on the layer you want to merge with
another one and drag and drop the icon onto the layer that you want to merge
with. The source layer will be deleted.
To copy one layer's contents to another layer: Click on the
layer you want to copy and start to drag. Hold down the CTRL key and keep
dragging. A + sign should appear. Drop the icon onto the layer you want to copy
the contents to. Now this layer will contain all the objects/elements from the
source layer together with its original contents, and the source layer will not
be deleted.
To duplicate a layer: Click on the layer you want to
duplicate, and drag the icon over the Add New Layer button.
To move an object from one layer to another:
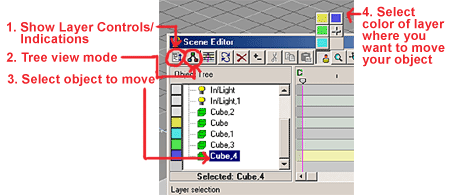
- Open up the Scene Editor and be sure that the layer
controls are visible. (To enable layer controls: Click on the first button of
the Scene Editor's toolbar, then enable "Show Layer
Controls/Indications".) The objects will have a color swatch in the Scene
Editor, indicating which layer they are on.
-
Be sure that the Object List is in Tree View mode
(default).
-
Select the object you want to move.
-
Click and hold the Layer Selection button. A little
window will pop up, with the colors of the layers in the scene. Click on the
color of the layer where you want to move your object.
-
Be sure that the Layer Selection button is selected (it
should be depressed when selected - if it's not depressed, click on it).
-
Click on the color swatch in front of the object you
want to move to another layer - it should change into the color of the layer where you want to
move it, and the object should be on that layer now. (Fig. 13.3 and Fig. 13.4)
|
 |

|
|
Fig. 13.3
|
Fig. 13.4
|
|
Another method for moving an object from one layer to
another:
-
Change the Object List display mode to Objects by Layers
by clicking and holding the view mode icon and choosing Objects by Layers.
-
To move an object or group to a different layer, click
on the object you want to move and drag it onto another layer's title.
|
Questions? Comments? E-mail me at Sue3d@render-lab.com
|