|
|
|||
|
|
|||
Tutorials |
|||
Getting Around in trueSpace 5 and 6Page 10 Quick-jump to topics in this tutorial: |
|||
|
|||
|
10. Animating
This section will give a brief overview of animating in trueSpace 5, 6.0 and 6.5. In version 6.5 there were some significant enhancements to the animation capabilities of trueSpace that go beyond the scope of this tutorial. Basic animating in versions 5, 6 and 6.5 are very similar with the main differences being in version 5 has a "Key Frame Editor" and versions 6.0 and 6.5 replace this with the "Scene Editor". Version 6.0 also saw the introduction of audio capabilities.
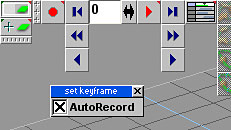
Animation Control Group and Animation Parameters Animation in trueSpace may seem a tough start, but like most aspects of trueSpace, they have taken great care to insure that things are laid out in such a way, that what you need is never far from your fingertips. The basic animation controls are placed by default on the toolbar in the top left hand corner of the workspace (Fig. 10.1). They consist of very familiar looking VCR style buttons that behave in a similar fashion to a VCR. The right hand button opens the "KFE" (Keyframe Editor) in trueSpace 5 or the "SE" (Scene Editor) in trueSpace 6.0 & 6.5. More on this later. Like all tools in trueSpace, several of the animation buttons have right click options. Right clicking on the record button brings up the "Auto record" option. With auto record enabled, animations are recorded by advancing the frame count and moving, rotating, scaling etc. the various objects in your scene. With auto record disabled, you have to remember to press the record button with every change. Note: to record for example an object moving, the move tool must be selected before the record button is pressed. Every time the record button is pressed or animation is recorded with auto record, trueSpace is generating keyframes (KF). Right clicking on the play button brings up some options, and this options panel will be different depending which version of trueSpace you have. In here you alter the playback options. (See Fig. 10.2) These settings are fully discussed in the manual.
|
|||
|
|
|
||
|
Fig. 10.1
|
Fig. 10.2
|
||
|
Ok, we now know enough to complete our first animation. Create a new
scene and place a cube primitive object on the left hand side of your
screen (It sometimes helps to have grid snap enabled - See Fig.
10.3).
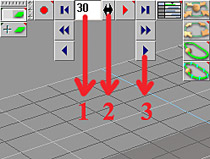
Make sure that "Auto record" is enabled by right clicking on the record button. The sequence of events now is to advance the frame number count and then move the object. Advancing the frame count can be achieved in several ways (See Fig. 10.4):
1) By directly typing in the new frame number in the frame count
box
|
|||
|
|
|
||
|
Fig. 10.3 |
Fig. 10.4
|
||
|
Let's advance the frame position
to frame 30 which equals 1 second of animation (if the base rate in the
animation parameters box was set to NTSC which is 30 frames per second).
Next move your cube to the right hand side of the screen. That's it.
Press the red play button and watch your cube moving across the screen.
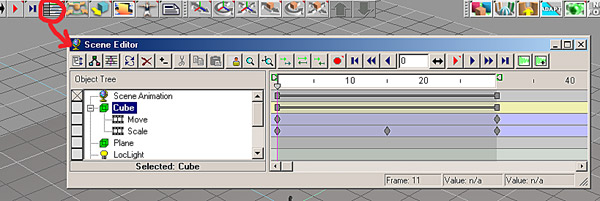
Key Frame Editor / Scene Editor One of the main areas of animation in trueSpace is the Key Frame Editor (KFE), or Scene Editor (SE) from version 6 and up. (Fig. 10.5) Here is where you can adjust timing, loops, and just about anything else in the scene. As we’ve seen already, the KFE/SE is a great tool for locating and selecting a single object in a complex scene. But so far, we’ve only used the left ‘explorer’ side. The right side shows the frame count as well as a track for each object within the scene. Once you have an animation attached to an object, you’ll be able to expand the sections under the object to see other aspects of the animation. As with all of the other areas within trueSpace, by holding your mouse over an icon, a description of the function will appear.
|
|||
|
|
|||
|
Fig. 10.5
|
|||
|
Let's return to our animation and add a plane under the cube to give it a nice floor to slide across. Then pan out a little in the scene and see if you can find one of the local lights off in the distance on the right. You can also use the KFE/SE to locate the light. Once you’ve got the light, right click on it and turn on the Cast-Shadows. This will give us a little bit more life in the animation, since the shadow should move in relation to the cube as it slides across the floor. Now, using the ‘VCR’ buttons at the top of the KFE/SE, advance to the end of the animation. Then resize your cube down by half. Once you release the mouse buttons, you’ll see new tracks recorded for the cube itself. If you play the animation now, you’ll see it start out full sized and then shrink as it moves around in the scene. Pretty cool huh? You can move to any point within the animation using the VCR controls. Either by using the Advance to:, the frame count slider in the middle, etc. By moving to the middle frame, we can then make further changes to the cube, which will start at this point and then be ‘undone’ when it reaches the end. For instance, if you resize the cube along X by half here, when you play the animation, you’ll first see the cube get ‘thinner’ while still shrinking a little, then it will be a cube again when it reaches the last frame. This kind of helps the morphing effect. Back in the KFE/SE, expand the Cube’s Animation area, you should now have tracks recorded for each action you performed on the cube, e.g. Move, Scale and Rotate. Each additional action that we make to this cube causes an additional reaction here in the KFE’s tracks. If you do something you find doesn’t work, you can come in here and remove only that part of the animation.
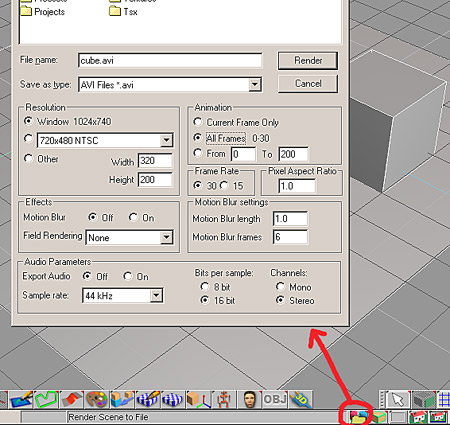
Now that you have a simple animation, you’ll want to render it out to view it completely with the shadow effects. As it is, even in Full-preview mode, you don’t get the full lighting effects until render time. When you do render out your scene, you have a number of options; Motion Blur, Frame Rate, File Type, Aspect Ratio, etc. While these can effect the overall quality of your render, that’s another chapter. ;) For now, change the file type to .AVI and make sure you render all frames, at 30 frames per second. (Fig. 10.6) If the animation has 30 frames, this will make our animation 1 second long. While this doesn’t seem long enough to really “see”, you’ll be surprised how much 1-second actually is. This will also show you how much time it takes to render a single frame. As your scenes get more complex, with textures, lighting effects (volumetrics, caustics, fog, etc.), object interactions and everything else that you can think of. This will give you a real appreciation for animations like Shrek, Toy Story et al. Not only for the modeling and stylized environments they’ve created, but the shear number of hours it takes to compile and render after the rigging and key-frame work.
|
|||
|
|
|||
|
Fig. 10.6
|
|||
|
After you select the basic options, trueSpace will then prompt you for the Codec to use. A simple one at this point should do. Again, there are a lot of options that can be selected here as well depending on the codec you use/have installed. This could be a chapter unto itself. We’ll have to leave this up to your own experimentation.
|
|||
|
This section was written by Nigel Doyle and James Diel.
Copyright © 2002-2012 by Susan Lee. |
|||