| TrueSpace has a unique interface which can baffle a
beginner. What are all those icons? Where are the menus? It might seem confusing
at first, but once you get to know your way around, everything will fall into
place. The goal of this tutorial is to facilitate this process for those starting out
in trueSpace. The tutorial does not go into details
about all the tools available in trueSpace, but rather, intends to introduce you
to the layout and navigation of the interface, so that it will be easier to get
started. Once you know how to find what you want, you can delve into the
different tools and possibilities by reading the manual and experimenting.
That's the best way to learn!
|
| 1. Help
is available!
|
|
There is a menu bar in trueSpace, though it’s
pretty short and it’s on the bottom of your screen, not the top. Don’t like
it on the bottom? No problem, you can change it – just go to File/Preferences,
and choose “TopMenu” in the pop-up window. (I leave mine on the bottom, but
if you like it better on top, go ahead.)
Also in the menu bar you can find the Help menu. Besides
finding an online manual and help file, you can also check the "Help
Bar" and "Tool Tips" options here (Fig. 1.1). I highly recommend that you
make sure that these options are selected. This way, whenever you hover your
mouse over a tool or option, you get a pop-up tip about what that tool does and
also an explanation about it in the help bar (Fig. 1.2).
|
|
 |
|
|
Fig. 1.1
|
Fig. 1.2
|
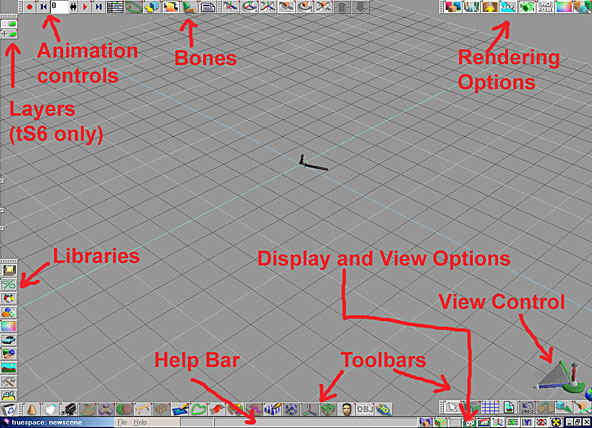
| Here's an overview of the workspace:
|
|
|
|
Fig. 1.3
|
| 2. Selecting views
|
| When you first open trueSpace, you start out in perspective
view. To center the selected object in your screen, double-click on it with the
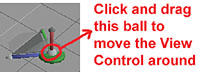
mouse wheel. To zoom in or out, turn the mouse wheel. The view control in
the lower right corner also lets you zoom in/out, pan, rotate the view, etc. You
can drag this gadget anywhere in your scene by clicking on the big white ball in the
middle of the tool and dragging it (Fig. 2.1). As you point your mouse over different areas
of the view control, they light up. Experiment with clicking on these different
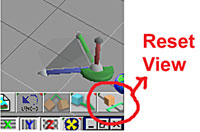
areas and dragging - they will move your view in different ways. If you want to
get the default view back, just click on the "Reset View" icon (Fig.
2.2).
|
|
|
|
|
Fig. 2.1
|
Fig. 2.2
|
| You can also select a 4-view layout where you can see your
object from different angles at the same time (Fig. 2.3).
By clicking in the center, you get a four-headed arrow and by
dragging this you can resize the view panels. You can also change the view
of each panel by clicking on the little house icon, holding down the mouse
button and navigating to the view you want (Fig. 2.4). If you have the standard view open,
you can also open up to 3 more view windows on top of this one and size and
position each view individually (Fig. 2.5). |
|

|
|

|
|
Fig.
2.3
|
Fig.
2.4
|
Fig. 2.5
|
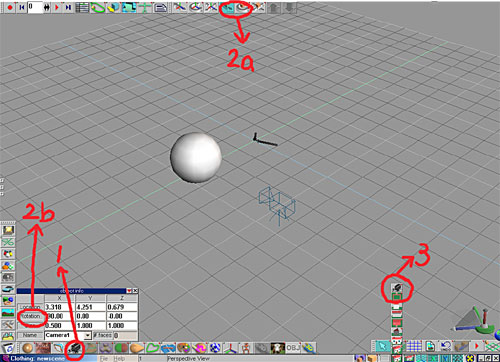
| You can also view an object or a scene from a camera,
light, or object (Fig. 2.6). To view from a camera, first create a camera by clicking on
the Camera icon (1). Position your camera where you want it: select Object Move
or Object Rotate from the top toolbar and move the camera (2a) or enter
the rotation numerically in the Object Info panel (2b). Next, select View From
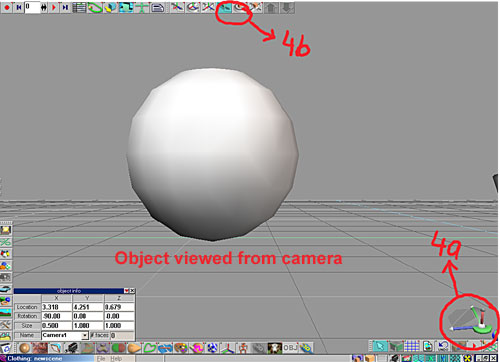
Object (3). Now you will see the scene from the camera's point of view (Fig.
2.7), which you
can change with the navigation tools (4a) or by manipulating the camera (4b). To view a
scene from a light or from an object, first select the light or object, then
select View From Object. Now you'll see the scene from the point of view of the
selected light or object. |
|
|
|
Fig. 2.6
|
|
|
|
Fig. 2.7 |
|
|
