|
|
|||
|
|
|||
Tutorials |
|||
Getting Around in trueSpace 5 and 6Page 11 Quick-jump to topics in this tutorial:
|
|||
|
10. Animating
Let's move on and learn about the various animation tools in
trueSpace. From the object library load the Porche 911 car object into a
new scene. We're going to drive this car around the screen and have a
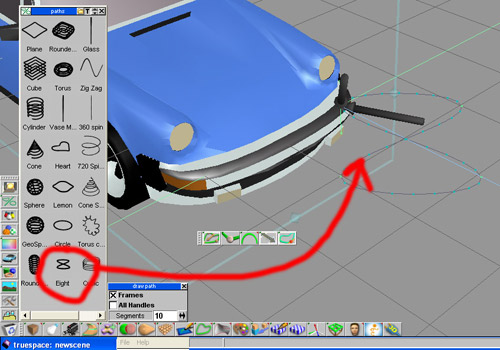
camera and spotlight follow it. If you open the KFE/SE, you’ll notice that there is already something a play-range at the top, going out about 40 frames. This is linked to the figure eight, which is linked to the car. So even though we don’t have an actual animation track for the car itself yet, we can hit the play button and the car will run around the figure eight. This is a very simple way of getting objects to move around a scene.
|
|||
|
|
|||
|
Fig. 10.7
|
|||
|
Pressing the Play animation button now will make the car move in a
very small fig 8 motion. Not quite what we want. Make sure that the show
path tool is enabled
|
|||
|
|
|
||
|
Fig. 10.8
|
Fig. 10.9 |
||
|
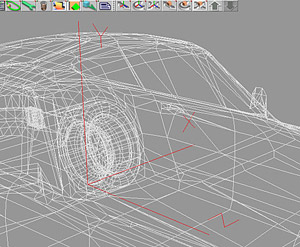
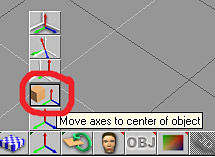
To move the axes to the center of the car, click on the "Move axes
to center of object" tool (Fig. 10.10). It's best if you switch to
"Draw objects as wire" for working with the axes (Fig. 10.11).
Now either click on the "Object Rotate" tool
|
|||
|
|
|
|
|
|
Fig. 10.10 |
Fig. 10.11 |
Fig. 10.12
|
|
|
Hide the axes by clicking on the "Show axes" tool or using the
Delete key. In trueSpace 5 and 6, since we deleted the animation, we
have to redo it. (Load the figure 8 path, scale it and enable "Look
Ahead" for the car.) In trueSpace 6.5, since we didn't have to
delete the animation to be able to move the axis, we don't have to redo
the animation, but we have to enable the "Look Ahead" option
again. Play back the animation and the car correctly follows the
path around the screen. Now let's add a camera somewhere outside the path and raised up a bit. To make the camera follow the car around the scene we need to first have the camera selected then click on the "Look at" button. In the KFE, you should now also see an Animation
track for the camera. By using the Look-At function, we’ve linked it
into the car's animation. Now if you play the animation, you should get
a kind of drive-by effect as the camera follows the car’s movement. It
is important to get the placement of your camera done before you use the
Look-at feature, as once it’s linked to the car's animation, any
movement or adjustments you make to the camera will be recorded as new
animation movements. This could be used to do a ‘bullet-time’ type
of animation where the camera flies around the car. While not exactly
how they do bullet-time, it could be used to create similar effects. To finish off our animation of the car, load the KFE or SE.
|
|||
|
|
|||
|
Fig. 10.13 |
|||
|
Select the 911 car object. Notice in the right hand window (called the track view window) that there are 2 animation tracks. One controls the entire scene and the other controls the car. In this case we have only one moving object so it doesn't matter which line we work on. Anyway select the little black square on the end of the right 911 animation track. Drag this to the right whilst watching its frame position alter in the status bar along the bottom of the KFE/SE. Stop when you get to 200 frames. Exit the KFE / SE and play back your animation. You now have a nice smooth animation lasting 201 frames. 201 frames? Where did the extra frame come from? Don't forget our first frame is frame 0 so in reality one second of animation is from frame 0 to frame 29. In trueSpace it's often a good idea to begin at frame 1 (6.5 warning: The new animation features always assume that you will begin at frame 0 and then adjust the animation later. trueSpace will automatically record a KF even with auto record off at frame 0). Also when working on an animation, always return to frame 0 before continuing to work on your scene or make changes. trueSpace has another quirk that objects jump around as though animated unless changes are made at frame 0.
|
|||
|
This section was written by Nigel Doyle and James Diel with some contributions by myself.
Copyright © 2002-2012 by Susan Lee. |
|||


