|
There are much more tools and options than there appear to
be at first glance.
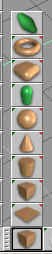
 If you look
at an icon and you see a little blue arrow in the upper left corner, it means
that there are more tools hidden there. Click on the icon and hold your mouse
button down, and you'll make these appear (Fig. 3.1). Just move your cursor to the tool you
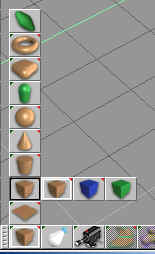
want while holding down the mouse button. If there is a little blue arrow in the
upper left corner of the tool you choose, even more tools or more versions of
that particular tool will appear (Fig. 3.2). If you look
at an icon and you see a little blue arrow in the upper left corner, it means
that there are more tools hidden there. Click on the icon and hold your mouse
button down, and you'll make these appear (Fig. 3.1). Just move your cursor to the tool you
want while holding down the mouse button. If there is a little blue arrow in the
upper left corner of the tool you choose, even more tools or more versions of
that particular tool will appear (Fig. 3.2).
|
|
 |
|
|
Fig. 3.1 |
Fig. 3.2
|
If you see a little red arrow in the upper right corner of
the icon, it means that by right-clicking, you will get to the options window of
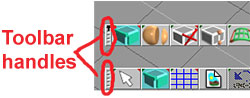
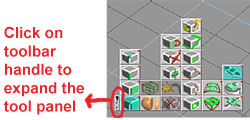
that tool. Every toolbar has a handle, which you can click on to expand,
shrink, or open the toolbar (Fig. 3.3. and Fig. 3.4). If you closed a toolbar, it will become a little
grey square (Fig. 3.5). This can be very useful if you need to hide some of the toolbars so
that you can see your scene better. To open the toolbar again, just click on
this little square. You can also click on the handle and drag the toolbar
anywhere you want on your screen.
 |
|

|
|
Fig. 3.3
|
Fig.
3.4 |
Fig. 3.5 |
4. Creating a primitive
|
|
Choosing and placing a primitive in the scene
To place a primitive in your scene, click on the first icon
in the bottom toolbar and hold down your mouse button. Now navigate to the
object you want - you can choose a polygonal, a NURBS or a metaball version of
most primitives. If you choose a polygonal primitive, then you can just click
anywhere you want in your scene and your object will be placed there. If you
choose a NURBS primitive in tS5, it will be automatically placed at 0,0,0
coordinates (in the middle of the scene). In tS6, if you choose a NURBS
primitive, you can place it where you want, the same way as with the polyhedron.
In both tS5 and tS6, when you choose a metaball primitive, it is placed at 0,0,0
coordinates. Of course, even if the primitive is placed automatically, you can
still just click on it and drag it wherever you want. If you want to place more
versions of the same primitive in your scene, just keep clicking away (keeping
in mind that when the primitive is automatically placed in the center, every
time you click, a new copy of the primitive will be placed at the same
coordinates). If you don't want any more copies of the same primitive, just
right-click on your object (this will take you to object edit mode), or
left-click on the Object Tool (the white arrow in the bottom right
toolbar).
Setting parameters and options for the object
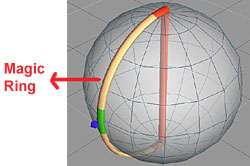
When you first put a polygonal primitive in your scene,
there is a “Magic Ring” around it (Fig. 4.1). Click on different parts of the ring with
the left and right mouse button (not at the same time) and drag the mouse
in different directions – you can change the primitive's parameters, shape and
size this way. Once you right-click on the object or left-click on the object
tool (Fig. 4.2), the Magic Ring is gone and you cannot get it back.
|
|
 |

|
|
Fig. 4.1
|
Fig. 4.2
|
|
|

|
|
Fig. 4.3 |
Fig. 4.4 |
|
If you want more precise, numerical control over your
primitive that you have just created, instead of the Magic Ring right-click on
the object icon right after you deposited your primitive in the scene. This will
bring up the “Primitive Shape” and the “Primitive Parameters” panels,
where you can change the properties of your primitive (Fig. 4.3). Again, once you get out
of this mode, you can’t go back to it again for the same primitive, it’s
just for starting out with a shape and size you want.
If you right-click on the Object Tool (the white arrow),
you’ll get the object info panel (Fig. 4.4). Here
you can numerically set the location, rotation and size of your object, give it
a name, and find out how many faces it has. If you click on the little red arrow
in the upper right corner you’ll get more information and options. By clicking
on the “render options” button you get another panel with more options. It's
always a good idea to give a name to your object. When you have a complex scene,
it will be much easier to find it in the Keyframe Editor (tS5) or the Scene
Editor (tS6).
Edit mode
Once you are done setting the starting properties for your
object, you can right-click on it and get into edit mode. Here you can select
faces, edges or vertices and do some editing tasks. There are several tools in
this panel that you can use with your object (Fig. 4.5). You can also use many other tools
for editing your object. These are in the toolbar. To use these tools, first
left-click on the object, then select the tool you want. Don’t forget that if
there’s a little blue arrow in the upper left corner, there are more tools
hidden there, and if there’s a little red arrow in the upper right corner of
the icon, you can right-click on it and get to the options panel for that
particular tool.
|
|

|
|
|
Fig. 4.5
|
Fig. 4.5
|
|
Sometimes you can’t seem to find the object editing
tool panel even after you right-clicked on your object. In this case, the
panel has been minimized and it might take a while to find it. Just look around
in your scene until you find the button . In the case of the polygonal objects,
it looks like the little grey square, but with a little black arrow on it. With
NUBRS and metaballs objects, it's the plain little gray square (see Fig. 3.5). Click on it, and
you’ll get the panel back. The panel, just like everything else, can be
minimized/expanded and dragged around the screen.
The Keyframe Editor (Scene Editor in tS6) contains a list
of all the items in your scene (Fig. 4.6). You can select objects here and by
right-clicking on them, you get a list of actions to perform on the object.
Moving and rotating the object
When you select an object by clicking on it, you'll see a
bounding box around it, with little diamonds here and there (Fig. 4.7). Click on these
diamonds and drag the mouse: this way you can rotate the object in different
directions. The different parts of the bounding box light up in yellow when your
cursor is over them. Click and drag these lines - the yellow lines close to the
corners will scale the object in different directions, and the yellow lines in
the middle will move the object in different directions, depending on which line
you are clicking on and dragging. You can also uniformly scale the object if you
click on any of the corners, hold down both the left and right mouse button at
the same time, and drag. To move your object vertically (along the z axis),
right-click on it and drag.
|
|

|
|
Fig. 4.7
|
|
You can also numerically enter sizes and rotation in the
object info box (right-click on the object tool - the white arrow - to access).
|
|
|
|
|
|
Previous
|
Back to Top
|
Next
|
|
