|
|
||
|
|
||
Tutorials |
||
Getting Around in trueSpace 5 and 6Page 12 Quick-jump to topics in this tutorial:
|
||
|
11.
Simulations
TrueSpace from versions 3 upwards supports physical simulation. TrueSpace 6.6 greatly enhanced the simulation capabilities to include the likes of tornados, electrostatic properties (magnetism) and glued objects breaking apart when they collide with other objects. (However, we have to note that unfortunately there seems to be a bug with planes in simulations in trueSpace 6.6. In those cases, substitute a cube for the plane and things will work better.) This section of the introduction to trueSpace will only cover the basic simulation properties found in versions 5 and upwards. Users who want more in depth material should consult the manual. The easiest way to understand and explain the simulation capabilities in trueSpace is to jump right in and play around. So let's make and run a few simple simulations and explain things as we go.
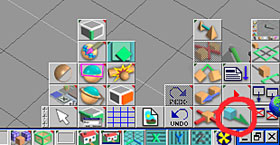
Tutorial 1 - Bouncing Ball Create a new scene and create a default size sphere on the grid. From the simulation toolbar, navigate your way to the rubber properties icon (Fig. 11.1).
|
||
|
|
||
|
Fig. 11.1
|
||
|
Selecting this assigns the properties of rubber to our sphere. Next we
need to raise the sphere up in the Z axis so that it is off the ground.
TrueSpace treats the grid or Z axis height of 0 as the ground. Click on
the green run simulation button
|
||
|
|
||
|
Fig. 11.2
|
||
|
You can play back the animation that has been generated by clicking on
the Play animation button.
|
||
|
|
||
|
Fig. 11.3
|
||
|
Okay, so change the simulation to 10 seconds and try
assigning new properties to the sphere. Different materials will make the
sphere bounce in different ways.
Tutorial 2 - Bouncing Ball with rotation Let's move on. In tutorial 1 the sphere would have bounced up and down
on the spot. In the real world the sphere probably would have started to
roll off to one side and eventually roll away. Using the same setup as in
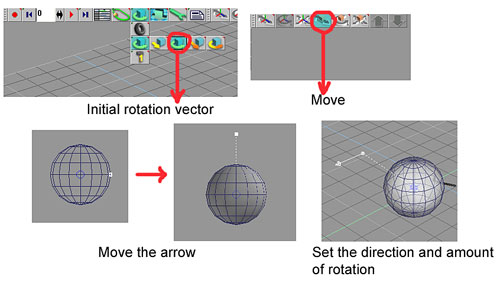
tutorial 1 now go and click on the initial rotation vector toolbar button.
|
||
|
|
||
|
Fig. 11.4
|
||
|
Run the simulation and with any luck the sphere will bounce up and down plus roll away in the direction of the initial rotation vector arrow. You may find you have too much rotation and the sphere rolls away too quickly. Here, just drag the arrow downwards towards the centre of the sphere to reduce the amount of spin. Play back the animation a few times and admire your handiwork. Because this is a simple simulation it should calculate very quickly. One thing to be wary of when creating simulations is they can quickly become complicated and takes hours to generate a simulation. Users contemplating working a lot with simulations should upgrade to trueSpace 6.6 as the simulation engine was greatly enhanced. Tutorial 3 - Pendulum Often in a simulation you want part of an object fixed to some point
like a pendulum in a clock with the weight swinging backwards and
forwards. To start with, create a default size cylinder. Next copy it and
rotate the original cylinder by 90 degrees in the X axis as in the
diagram. Resize the copy so that it looks something like the diagram.
(Fig. 11.5) Glue the 2 cylinders together with the "Glue as
Sibling" tool.
|
||
|
|
||
|
Fig. 11.5
|
||
|
So that our object swings properly it is helpful (although not
essential) to change the axis location of the combined object. So, change
to a side view and show the pendulum objects axis. Let's give the pendulum the properties of iron
|
||
|
|
||
|
Fig. 11.6
|
||
|
Select the object tool to take you out of fixation point editing, then select and rotate the pendulum 45 degrees in the Y axis. Set up the simulation to run 10 seconds with erase script enabled. Run the simulation. In a little while you will have an animation where the pendulum swings back and forth several times. You may be wondering why the pendulum swings so slowly. The reason is trueSpace is calculating the simulations based upon the size of the objects. In this case, the weight is 2m in all 3 axes. Imagine a real pendulum 2m in size swinging. Users of 6.5 and above can test this out by changing the scene units to cm from metres. Try this and run the simulation again. This time the pendulum will swing much quicker. Tutorial 4 - Wind There's 2 basic types of wind in trueSpace. Local wind
|
||
|
|
||
|
Fig. 11.7
|
||
|
Run the simulation over 10 seconds and see what happens. It's very likely nothing will happen. There's 2 reasons why, the first the wind isn't strong enough and secondly the cubes are on the ground and the wind strength isn't enough to overcome the friction of the object interacting with the imaginary ground plane. Increase the wind strength to 10 and run the simulation again. If nothing much happens try raising the cubes off the ground. This will make the lighter objects in particular begin moving sideways before they hit the ground. Play around with this then carry on with the last tutorial where we alter the friction of the cubes. Tutorial 5 - Modified Wind tutorial Start a new scene and set up the 6 cubes just like in the previous
tutorial with them all along the ground plane. This time when you assign
the physical properties, right click on each parameter e.g. set parameters
of wood tool.
|
||
|
|
||
|
Fig. 11.8
|
||
|
Tech tip: If you've ever run a simulation with a car model
and wondered why the back wheels always lift off the ground, it's caused by
friction. TrueSpace doesn't know it's a car and treats the car model like
it would with a sphere and the car object will begin to roll. The cure
here is to reduce the amount of friction so as to give the illusion that
the wheels are turning. This will keep it firmly on the ground.
You can have quite a bit of fun by making 4 low walls and placing a few
cubes inside the 4 walls and reduce the friction on all objects. Either
have a global wind or give each object some initial motion So that brings us to the end of this section. We've only just scratched the surface of what's possible in trueSpace. As mentioned trueSpace 6.5 and 6.6 have a greatly enhanced toolset. Things like tornados are incredibly fun to play with!!
|
||
|
This section was written by Nigel Doyle.
Copyright © 2002-2012 by Susan Lee. |
||


