|

|
     
|
UV mapping with trueSpace and UVMapper Pro
Page 2
|
|
7. Now we can turn our attention to UV mapping the other
parts. Select them by group, then choose a UV mapping method.
The skirt is a boxy shape, so I chose the box method for it. I
deselected "Split front/back". This is fine if you'll have the
same texture on all sides of the object (or at least the same texture on
the front and back and the same texture on the sides). If you want
the texture to be different on all four sides, or if the texture will be
different on the front and the back or the two sides, then it's good to
choose to split the front and back.
|
|
I wanted the UV map of the torso to have a front and a back, so I mapped
that part with a Planar mapping method on the Z axis. This method,
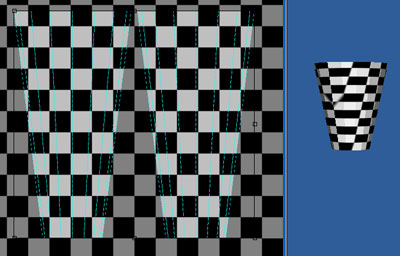
however, distorts the checker pattern on the sides. (See Figure
12.) To fix that, select the bottom row of UVs (in UVMapper Pro,
click the "Select by vertex" button on the toolbar, right next
to the "Select by facet" button; then select them with the
Rectangle Marquee Tool; in UVMC, go to Edit / Select by / Vertex,
then draw a rectangle around the vertices) then scale them (keep
hitting the + key on the keypad) until they are the same size as the UVs on the top. Do this with both sides.
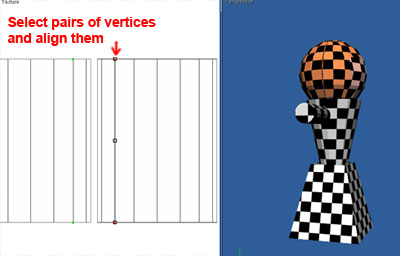
You can also align the UVs in a more precise way by selecting
a the vertices of a vertical edge and going to Tools / UV's / Align U.
Do this with all the edges. (See left side of Figure 13.) It's looking better now, but
as you can see in the right side of Figure 13, since the UVs on the sides are closer together
than in the middle, this makes the checker pattern more stretched in
those areas.
|

|

|
Figure 12
|
Figure 13
|
|
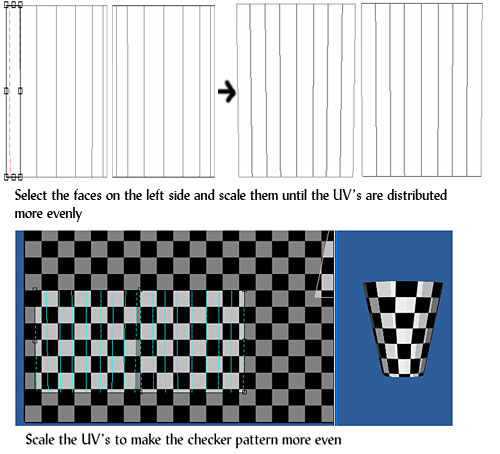
Let's fix that stretching problem. First, move the UVs of the front and
the back side a bit further apart from each other to make some room
between them. Then select the first two faces on the left side of the
front part. You might want to clear the checker texture for now,
so that it would be easier to see what you're doing. To do that, go to
Texture / Clear and say Yes to the pop-up window which asks whether you
want to clear the background. Now scale the selected faces horizontally
until the face which is second from left looks about the same size as
the others. Now select only the first face, and scale it until that face
is about the same size, too. Now do the same thing with the right side,
then do the same steps with the UVs of the back part, too. The aim is
to make the UVs more even. Put the checker texture back on, and you can
see that they look much better on the mesh now. Don't forget to also
scale the UVs to make the squares in the checker texture even. See
Figure 14. This part is just a simple cylinder with one face on the top and
bottom, and we're not going to worry about those faces now, but if it
was a more complex model, you would also want to spread out the UV's on
the top and, if necessary, on the bottom part, too. Also, since
this is a very simple object, with no horizontal divisions of the faces
around the trunk, those faces are long and elongated. Plus, the bottom
part of the object is scaled smaller than the top part. Because of this
it's very hard if not impossible to make those checkers really square
everywhere. When you work on more complex models, with more divisions,
it will be easier to make those checkers really square.
|

|
Figure 14
|
|
Since the head was painted with three different colors inside
trueSpace (hair, face, bottom of the head), it is easy to map those parts separately in UVMapper.
You can select those areas by group or by material, then use their own
mapping method. I left the mapping of the hair and the bottom parts alone, because
they were fine
the way they came from trueSpace. For the face part, I chose Planar on the
X axis. (Imagine that you're projecting an image on the face - if you
look at the axes in the object view window, you can see that the X axis
is the one along which the projection would be the best.) Also, don't
forget to scale the UVs of these parts, too, to make the checker
texture on them nice and squared.
|
|
Previous
|
Next
|
|

Copyright © 2002-2012 by Susan Lee. |