|
|
|
|
|
|
Tutorials |
|
UV mapping with trueSpace and UVMapper Pro |
|
|
This is a simple UV mapping tutorial, using trueSpace, the luuv
plug-in and UVMapper Pro. I
originally made a shorter version of this tutorial for a Renderosity trueSpace forum
thread, so the mesh is very simple, made out of primitives grouped
together, but hopefully the tutorial will
still be helpful in explaining the basics. You can download the support
files here. They
include the original figure in .obj format, so you can follow along
using the same object that I used for this tutorial.
UVMapper Pro is a very good program and it has more features than the UV Mapping Editor in tS6+. There is also a free version, called UVMapper Classic, which could be used for basic UV mapping. I'll indicate the corresponding steps if they are available in UVMapper Classic, so if you only have that version, you will still be able to make a basic UV map. I'll call this free version UVMC in the tutorial. UVMapper Pro has a lot of extra features that make mapping much easier, and I will explain some of those, too. Inside trueSpace:
|
|
|
1. If the mesh you want to UV map is made up of different objects
grouped together, then name each object in the Object Info box, so it
will be easier to figure out which part is which in UVMapper. E.g. head,
arms, torso, etc.
2. If you want to map certain faces of your mesh separately,
put different colors on them. (Choose a different color, select the faces, then bring up the
Material Editor and click on the Paint Face tool. 3. Export the mesh in .obj format with the luuv plug-in.
(ALT-click on the plug-in's icon to export
|

|
Figure 1 |
|
Inside UVMapper:1. Load the object (File / Open Model). (UVMC: File / Load Model.) If I get the message about out of range UV coordinates, I just click OK to correct them. Figure 2 shows how it's going to look in UVMapper. (I'm using the Pro version; the free Classic version might look a little different, but it should basically be the same.) 2. Go to Select / All, then Select / Quarter, or scale the map down manually. You can also just hit the / key on the keypad or use the - key. (UVMC: Edit / Select / All, then hit the / key to quarter size the map, or the - key to scale down, or just manually scale the map.) Then move the map to one corner of the work space, like in Figure 3. This is so that it will be easier to isolate and place the different parts' UVs on the map.
|
|

|
|
Figure 2 |
Figure 3 |
|
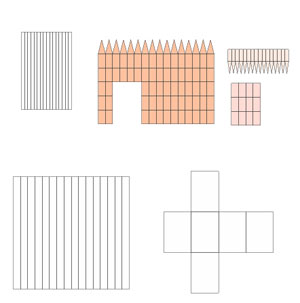
3. If the object is made up of different parts grouped together, then go to Select / Select by / Group, and select one of the parts. (UVMC: Edit / Select / by Group.) Now move this part to an empty area and scale it if necessary. See Figure 4. 4. Repeat with all the other parts, scaling and positioning the UVs so that they will be nicely laid out and separated. See Figure 5.
|
|

|
|
Figure 4 |
Figure 5 |
|
5. Now comes the harder part: choosing what mapping method to use for
each part, on what axis, and with what options. You can read the help files and
experiment which method works best for the particular shape. Just imagine that
you want to wrap an image around that part and think about what would work
best. For example, if you have a pretty flat surface, you would choose Planar
mapping for that. If the shape is cylindrical, use Cylindrical, if it's boxy,
choose Box, etc. The axis determines from what angle you would wrap that part.
In UVMapper Classic it can be a case of trial and error, but in UVMapper Pro
there are things that can help a lot.
|
|
|
To map a part, first select it (you can select it the way we did before:
through the menu, or you can select the Rectangular Marquee tool and the Select
by Facet option in the toolbar (Fig. 6), then draw a rectangle around the
part you want to map. You can also right-click on the part and select by group,
material or region. (UVMC: select through the menu, like before, or draw a
rectangle around the part.)
|
Figure 6 |
|
Then, go to the Map menu and choose the mapping method you want to use. (UVMC:
Edit / New UV map / ....) For example, the arms are cylindrical, so
I'll choose Cylindrical Mapping for them. I get a popup window where I can set
more options. The X axis goes left to right, the z axis goes back and forth,
and the Y axis goes up and down. In UVMapper Pro you can also look at the object
that you're working on. You can have two or more windows open at the same time.
In the default state, the UV map is on the left and the object view is on the
right. You can click on the window you want to work in and then that
window will become active. In fact, I've found that sometimes I have screen
refreshing problems, and it helps to click on the window I want to see the
changes in. In the perspective window (on the right) you can see the axes in the bottom left
corner, and that will help you choose which axis to use for which UV map. (Be sure
that the Axes option is on in the View menu.) The Z axis does not seem to be
shown, but you can imagine it being there at a 90 degree angle to the X axis.
(You can also imagine the X axis going left to right in the workspace, the Z
axis going front to back, and the Y axis going up and down, and that would also
help in deciding which axis to choose, especially in UVMC, where you don't have
an object view window.) You can rotate the camera around the object by clicking on the Rotate Tool (the
curved arrow in the toolbar). I also find it helpful to turn Transparency and
maybe the Smooth option off in the View menu. When you want to work in the
map (texture) window again, click on the Rectangular Marquee tool. Since the arms are positioned along the X axis, I chose to map them on the X axis, and to separate the caps. (See Figure 7.) Figure 8 shows the resulting UV map for that part.
|
|

|
|
Figure 7 |
Figure 8 |
|
6. Next, you can tweak the UV map by rotating, scaling, moving UVs,
etc. You can rotate your UV map by selecting the UVs, going to Select / Rotate,
then choosing how you want to make the rotation. I wanted the UV map of the arm
to be in a similar position as the arms themselves (i.e., horizontal, not
vertical), so I rotated the UVs of the arm
by 90 degrees clock-wise. (UVMC: I couldn't get the Rotate tool to work, so
I'd do a planar map here instead.)
|
|
|
In UVMapper Pro you can put a checker texture on your model to examine whether the UVs are lined up correctly. To do that, go to Texture / Checker and choose one of the textures. Here I chose the small checker texture. Now if you look at the object , you will see that the squares in the texture are squashed. (See Figure 9.) This means that if we leave the UV map like this, and make our own texture for the object, it will be squashed, too. So, let's fix that here, before getting to the texturing part. (If even the small checker texture is too big for the object, you could load the Color texture instead and examine the grid pattern on the mesh. If the grids look square, you're fine. The Color texture also helps with checking whether the UVs are oriented correctly.)
|
|
|
Figure 9 |
|
|
Select the UVs, then scale them while watching the squares in the checker
texture change in the window on the right. I had to make the UVs horizontally wider and vertically
narrower to make the squares really square. See Figure 10. You can rotate the
model to have a better look by clicking on the curved arrow in the toolbar,
then switch back to moving on the UVs by clicking on the Rectangular Marquee
tool and selecting the UVs again.
Once the the checkers are all nice and square, you can be confident that your textures will come out nicely, too, once you made them and put them on the object. |
|
Figure 10 |
|
|
Since I mapped this part with the "separate caps" option, I also have
the caps to worry about. So I zoomed into that area (click on the magnifying
glass icon in the toolbar, hold down the left mouse button and drag; pan with
the middle mouse button or use the hand tool). I selected those faces, then scaled them to make them
round. See Figure 11.
|
|
Figure 11 |
|
|
|
|
|
Copyright © 2002-2012 by Susan Lee. |
|