4. Importing default Poser characters
Importing default Poser characters is very similar to importing DAZ
characters, with just a couple of differences:
Poser 4 characters
The skin texture of the Poser 4 characters have both the head and the
body on the same map, so you don't have to load different maps for the
head and the body when making changes - just apply the same skin texture
to the whole figure.
Poser 4 characters have only one eyeball part per eye, so you can just
simply texture the eyes and make them shiny without having to apply
two different textures. To do this, first load the texture in the
Material Editor, then adjust the parameters in the reflectance channel,
then apply this shinier texture to the eyes only by clicking on one of
them with the "Paint over existing Material" tool.
There are no upper eyebrows (the eyebrow is painted on the head
texture), so you don't have to apply a transparency map to them, but you
do have to apply a transparency map to the eyelashes. To do this, choose a
color for the eyelashes, load the transparency map, then click on one of
the eyelashes with the "Paint over existing Material"
tool.
Poser 5 characters
Poser 5 characters have three texture maps: one for the head, one for
the body, and one for the eyes. So, if you want to make changes to the
skin texture, you have to do it separately for the body and the head,
just like with the DAZ characters. To change the head texture, first
open the Material Editor, then choose the Inspect tool. Click on the
head - this will load the head texture into the Material Editor. Make
your changes and apply the new texture to the head with the "Paint
over existing Material" tool. Now do the same for the body.
Just like Poser 4 characters, Poser 5 characters have no upper
eyebrows; the eyebrows are painted on the head texture. For the
eyelashes, you have to load and apply the transparency map just like we
did with the DAZ characters and Poser 4 characters.
One big difference, however, is that the Poser 5 characters' eyes
have 4 parts: a transparent and shiny outer eyeball, the inner eyeball
which has the eye texture, a disk for the pupils and a disk for the
lens. So, if you import a Poser 5 character, you have to break it up
into its groups.
If you import the character with the "Preserve groups"
option unchecked, do the following:
- First make the changes to the skin textures and apply the
transparency maps to the eyelashes.
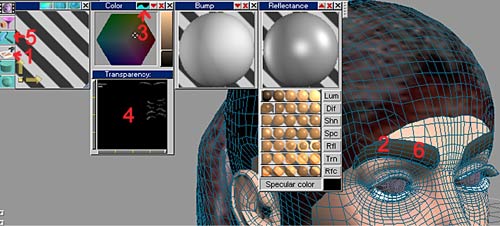
- Then click on "Decompose into objects" (1). If you open
up the Keyframe/Scene Editor, you can see that now the character is
broken up into its parts. Choose the wireframe display mode to enable
you to see better (2).
- In my scene, the left eye parts are "NoName, 46 - 49. The
first one among these is the outer eyeball. Make it transparent just the
way we did with the DAZ character. (3)
- The next object in the list is the inner eyeball. Load the eye
texture, make the reflectance shader "matte", and apply this
texture to this object. (4)
-The next object is the lens. You can make this totally
transparent. (5)
- The last object in this eye group is the pupil. This should already
be black. If not, make it all black.
- Do the same steps for the other eye's groups, too.
(See Figure 4.1)
|