Importing Poser Characters into trueSpace 5 and 6
with the luuv plug-in
Page 2
|
3. Importing a DAZ character
All right, after all those preparations, now you're ready to import
your character into trueSpace.
Open up the plug-in, navigate to the folder where you saved your
character and double-click it. Luuv will start working on importing the
object and the textures and setting up the groups, if you enabled the
"Preserve groups" option.
Once your character is in your scene, you'll notice that the transparency
maps are not transferred over in the .mtl file, so you'll have to set
them up yourself within trueSpace.
|
| 3A. The Eyes
Let's start with the eyes. DAZ
characters' eyes prior to Victoria 3 were made up of two spheres: the outer eyeball, which needs to be transparent and shiny
and the inner eyeball, which has the
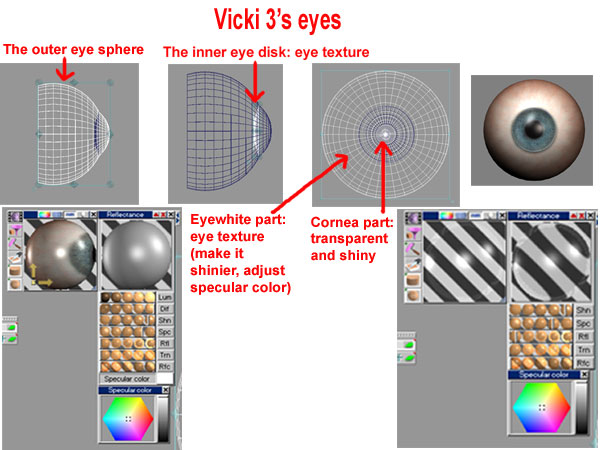
eye texture. Victoria 3's eyes are a little different: they have 4
material zones and they are made up of two objects: a sphere (actually
the back part of the sphere is sliced off so it's not a whole sphere) and a disk
behind the sphere. The sphere's eyewhite part is textured with the eye
texture and its cornea part is textured transparent. The disk has the
iris and the pupil texture. (Figure 3.2)
There are several different methods that you can use to texture the eyes.
Which method you'll choose will probably depend on which figure you're
importing, how you're going to use the character in trueSpace and which
method works best for you. If you're going to have a close-up of the
character's face in a scene, it might be best to break the eyes up into
their groups so that you can texture each part correctly and in the most
realistic way. (Victoria 3, however, might not need this step - see
below.) If you are not going to have a close-up
of the character, then for figures other than Vicki3, you can make the
outer eye sphere transparent without decomposing the character or the
eyes. This will show the iris and the pupil
underneath, but it seems that for some reason the eyewhite part of the
eye will be totally white, without the eye texture (which usually has
pinkish areas and little blood vessels) applied to it. Another
method would be to make a new eye texture for the outer eye which would
include the eyewhite, iris and pupil areas and to apply this texture to
the outer eye sphere. I will describe texturing Victoria 3's eyes
separately.
- Breaking the eye up into its groups
First of all, make sure that the "Enable raytracing"
option is on in the render options toolbar  and don't forget to save the .obj, .mtl and texture files inside the
trueSpace folder. (The .mtl file includes the texturing information and
is automatically created when you save your character in the .obj file
format.)
and don't forget to save the .obj, .mtl and texture files inside the
trueSpace folder. (The .mtl file includes the texturing information and
is automatically created when you save your character in the .obj file
format.)
If you imported your character with the "Preserve groups"
option enabled:
- Open up the list of parts in the Keyframe Editor
(tS5) or Scene Editor (tS6), and select one of the eyes.
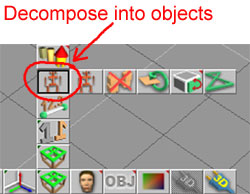
- After selecting the eye, click on "Decompose into objects".
(Figure 3.1)
In tS5, click on the Refresh button  in the Keyframe Editor's toolbar to
show the new hierarchy. In tS6, scroll down until you find the newly
created eye group. Click on the + sign in front of the eye group and select
the first object in the group; this is the sphere that needs to be
transparent. in the Keyframe Editor's toolbar to
show the new hierarchy. In tS6, scroll down until you find the newly
created eye group. Click on the + sign in front of the eye group and select
the first object in the group; this is the sphere that needs to be
transparent.
|
|
|
|
Figure 3.1
|
- Load the glass shader from the Reflectance Shaders Library, make it
shiny and set the transmission and refraction values at 1.
- Click on the Paint Object  tool to apply the transparent and shiny
material to the outer eye. tool to apply the transparent and shiny
material to the outer eye.
- Now select the second object in
the eye group. Load your eye texture map and set the reflectance shader
to "matte" (the matte reflectance shader is also in the
Reflectance Shaders Library). Apply the texture to this object with the Paint
Object tool.
- Repeat the whole procedure for
the other eye.
If you imported your character with the "Preserve groups"
option disabled:
- First you'll have to decompose the mesh into its
parts. Just select the character, then click on "Decompose into
objects".
- Open up the list of parts in the Keyframe/Scene Editor. You'll see
that now the different parts do not have their descriptive names, only "NoName" and a number. Set the display option to
wireframe. Click on the
items in the list and you'll be able to see which part is which.
- As you go down the list, find the eyes and you'll see that they are already
broken up into their 2 separate parts. Again, in each group, the eye
part that is listed first (and is a little bigger than the other eye
part) is the one that needs to be transparent. So,
load the glassy texture and apply it to this one. Then, load the eye
texture map and the matte reflectance shader and apply that to the
second part.
- Do this for both eyes.
- Making a new eye texture for characters
The eye texture of DAZ characters before Victoria 3 were
included in the head texture file. If you look at the UV template, you
can find the area where the outer, transparent eyeball is mapped.
This is usually left white. If you copy and paste the eye texture to
this area and scale it to the appropriate size, you can apply this eye
texture to the outer eyeball inside trueSpace. This way you just have to
texture the outer eye and don't have to worry about breaking
up the eyes into groups, and texturing two separate spheres. So it's a
faster way of texturing the eyes, but as I pointed out before, for
close-ups you might still want to go with the previous technique.
I describe the steps of making this new eye texture in detail in the
Tips and Tricks area.
- Making the outer eyeball transparent
Another method is just to make the whole outer eyeball transparent
and shiny with the glass shader. This will reveal the pupil and iris
texture underneath, but there are some drawbacks. One of them is that for some
reason the eyewhite part will be all white and without the eye texture
applied to it, and the other is that later on you can't easily change the
eye texture if you want to (other than breaking the eye
up into groups after all or applying the eye texture to the outer
eyeball). You can make the outer eyeball transparent without
breaking up the character or the eyes into their groups by loading the
glass shader, then clicking on the eye with the "Paint over
existing Material" tool  . .
- Texturing Victoria3's eyes
As I mentioned earlier, Vicki3's eyes are a little different than the
earlier DAZ characters and they are a little easier to texture inside
trueSpace. Here are some methods that you can use:
- Load the glass shader (with the same settings as I mentioned above)
and click on the middle of the eye, where the pupil would be, with the
"Paint over existing Material" tool . This should make the
cornea transparent and now the pupil and the iris should become
visible. You might also want to click on the eyewhite part of the eye
with the "Inspect" tool  to
load the eye texture, make it a little shinier, then click on the
eyewhite part
with the "Paint over existing Material" tool to apply
the new, shinier eye texture to it. to
load the eye texture, make it a little shinier, then click on the
eyewhite part
with the "Paint over existing Material" tool to apply
the new, shinier eye texture to it.
- You can decompose the character or the eye the same way as
described above and texture the eye parts individually. For the outer
eye sphere, you'll need to load the eye texture and click on the
eyewhite part with the "Paint over existing Material" tool,
then load the glass shader and click on the cornea part with the
"Paint over existing Material" tool. For the iris/pupil part,
just load the eye texture and apply the material to the whole object
with the "Paint Object" tool.
- Since Vicki3 has a separate eye texture map, you could apply this
texture to the outer eye sphere without breaking the eye up into its
groups. To do that, load the eye texture, then click on the
eyewhite and also the cornea part with the "Paint over existing
Material" tool.
|
|
|
|
Figure 3.2
|
|
