Importing Poser Characters into trueSpace 5 and 6
with the luuv plug-in
Page 4
|
5. Tips and tricks
5A. Making changes to the skin texture
If you want to make changes to the textures of your imported
characters, you can do that easily by following these steps:
- Load the Material Editor, then choose the Inspect tool 
- Click on the particular part you want to texture - this will load
the texture into the Material Editor
- Make your changes inside the Material Editor
- Apply the new texture to the given part only by choosing the
"Paint over existing Material" tool, then clicking on the part
to be textured. 
|
| You might also want to increase the shininess
of the skin a little in the Reflectance panel.
If you want to make the lips shinier, just click on the lips with the
Inspect tool, increase the shininess, then click on the lips
again with the "Paint over existing Material" tool.
|
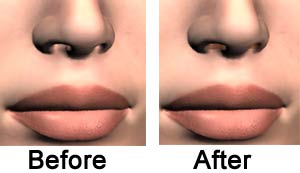
| 5B. Prevent glowing nostrils
Depending on the texture map and the kind of shadows you use for your
lights, some Poser figures' nostrils might look too light. You can correct this in
postwork,
or you can download Traveler's no-glow nostril props for Michael 2,
Victoria 2 and Stephanie here: http://www.morphworld30.com If
you use these, don't forget to include them in the list of items to save
when you export your .obj file from Poser, then, once inside trueSpace,
give them a dark, semi-transparent texture.
You could also make your own props by scaling down 2 cylinders to fit
in the nostrils and making the texture dark and semi-transparent. These
are the settings I used for my cylinders:
Size: x = 0.048, y = 0.048, z = 0.040
Rotation: x = -10.00, y = 0.00 z = 0.00
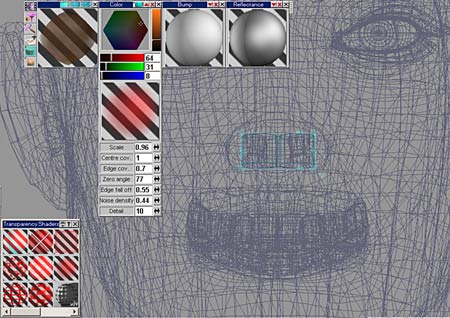
Color: R = 64, G = 31, B = 8 Transparency shader: "glow",
Scale = 0.96, Centre cov. = 1, Edge cov. = 0.7, Zero angle = 77, Edge
fall off = 0.55, Noise density = 0.44, Detail = 10. (Figure 5.2) Of
course, you can experiment to find the settings you like the best. |
|
|
|
Figure 5.2
|
|
|
|
Figure 5.3
|
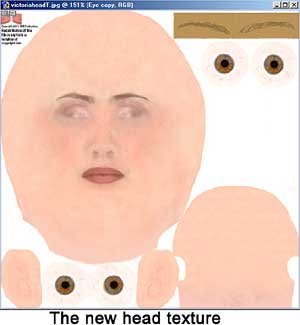
| 5C. Making a new eye
texture map for the outer eyeballs As I mentioned before,
before Vicki3 DAZ characters' eyes were made up of two
spheres each: the eyes, which have the eye texture applied to them, and
the outer eyeballs, which are transparent and shiny. If you want, you
can copy the eyes' texture to the eyeballs' texture in the UV map. These are the steps
to follow to do this: (You need an image editing program, preferably
with layers, for this. I use Photoshop, so that's what I'm going to talk
about here. I'm using Vicki2 as an example here; Michael2's and
Stephanie's eyeballs are mapped to a different area, so you'll have to
adapt the technique to their UV map.)
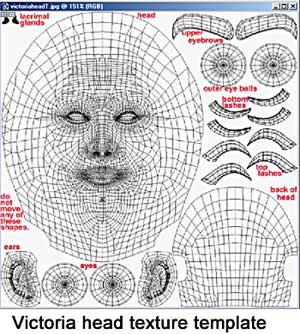
1. Open up the head texture you are going to use and also the texture
template for the character's head. (You can download the texture
templates from DAZ if you don't have
them.) (Figure 5.3)
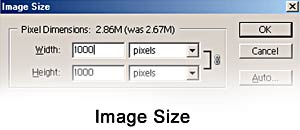
2. Make the texture template the same image size as the head texture.
(In Photoshop, go to Image/Image Size and enter the same values in the
width and height boxes of the Pixel Dimensions area.) (Figure 5.4)
|
|
|
|
|
Figure 5.4 |
Figure 5.5
|
|
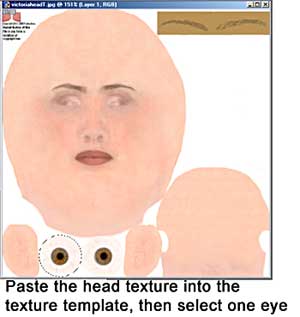
3. Make the head texture active, then Select/Select All/Copy.
4. Make the texture template active, then Paste.
5. Choose the Elliptical Marquee Tool and draw a circular marquee
around one of the eye textures. (Figure 5.6)
|
|
|
|
Figure 5.6
|
|
6. Copy, then Paste.
7. Select the Move tool.
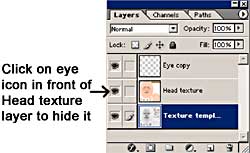
8. Hide the layer with the head texture. (Figure 5.7)
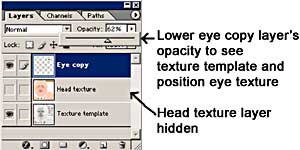
9. Lower the opacity of the layer with the eye texture copy so that
you can see the texture template underneath. (Figure 5.8)
|
|
|
|
|
Figure 5.7 |
Figure 5.8
|
|
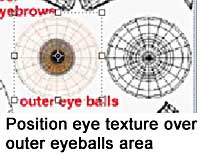
10. Position this copy above one of the eyeballs. (Figure 5.9)
11. Make the opacity of this layer 100% again.
12. Paste again to get another copy of the eye texture, lower the
opacity of this layer, and move this eye texture to the other eyeball,
then increase the opacity of the layer to 100%.
13. Unhide the layer with the head texture.
14. Save your new head texture. (5.10)
|
|
|
|
|
Figure 5.9 |
Figure 5.10
|
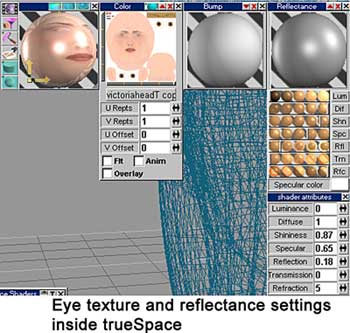
| 15. Now, when you import your character into trueSpace, you can just
load this new head texture and apply it to the outer eyeball. Don't
forget to also make the eyeball shiny. You can use the Caligari Phong
reflectance shader, and increase the shininess, and maybe add a little
reflectivity. (Figure 5.11) |
|
|
Questions? Comments? E-mail me at Sue3d@render-lab.com
|
