Importing Poser Characters into trueSpace 5 and 6
with the luuv plug-in
Page 1
If you want to import Poser characters into trueSpace, you
can use Clinton Grant's excellent free plug-in called luuv. This plug-in
can import and export .obj files with their textures. To download a copy,
go to
http://www.pinacoderm.com/tsx/luuv
To download a PDF version of this tutorial, click here: 
1. Inside Poser
Pose and texture your character inside Poser before
exporting it.
Luuv needs to have the textures in the same folder as the
.obj file. For easy texturing inside trueSpace, the
best thing to do is to make a new folder inside your trueSpace
folder where you will save your .obj
file and where you can place copies of all the textures used for that
object.
When you are ready to export your object, go to
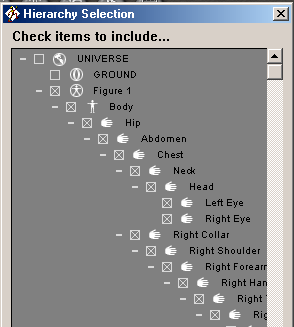
File/Export/Wavefront OBJ. In the Hierarchy Selection window, first
uncheck everything by clicking in the box in front of
"Universe", then select the object(s) you want to export.
(Figure 1.1) If you are exporting a group of objects (e.g. a character
with hair and clothing), don't forget to scroll down and check all the
items.
|
|
|
|
Figure 1.1 |
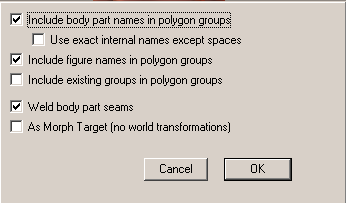
For the save options, choose the following:
- Include body part names in polygon groups
- Include figure names in polygon groups
- Weld body part seams
(Figure 1.2) |
|
|
|
Figure 1.2
2. Opening luuv in trueSpace
and choosing the options
To load luuv, click on
"install new trueSpace extension"  and navigate to the folder where the plug-in is located (e.g. trueSpace5/Tsx/luuv),
then double-click luuv.tsx.
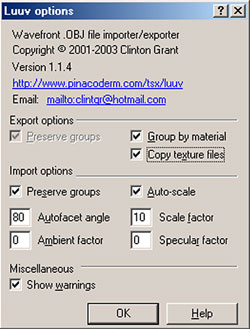
 If you right-click the plug-in's icon
 , you
get a pop-up window with the options. (Figure 2.1) , you
get a pop-up window with the options. (Figure 2.1) |
|
|
|
Figure 2.1 |
| Let's go through these options to see what
exactly they do and when/if we might need to change them:
Export options
Preserve groups
If you are exporting a grouped object you can choose whether or not you want
it exported with its groups. If you don't, then uncheck the
"Group by material" option. This will enable the
"Preserve groups" option, so you can uncheck that, too. In
this case a single mesh will be exported. If you open this in UVMapper,
there will only be one item listed in the Groups, but if the object had
more than one texture applied to it all of these textures will be listed
under the Materials, so you can still choose particular materials and
assign them to new groups inside UVMapper.
Group by material
Luuv exports the texturing information when you save your mesh as an
.obj file. This is very useful, because by giving different colors or
textures to different parts of your object you can later isolate these
parts inside UVMapper for individual mapping or for
assigning them groups. For example, you
could paint the collars of a shirt with a different color than the
body of the shirt. Then, inside UVMapper, you could select the
collars by going to Select/Select by/Material and select the
collar's material. Then you could use planar or spherical UV mapping on
the collars while using cylindrical UV mapping on the rest of the body.
Another helpful step to take before exporting your object is to give
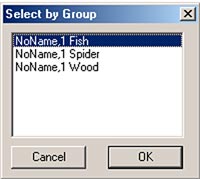
names to the different parts of a group. For example, if you named a part of your object
"Wood", then you can go to "Select/Select by/Group" and a window will
pop up listing the different groups with their names, one of them being
something like "NoName, 1 Wood". This would make it easier to identify the
different groups of your object in UV Mapper. (Figure 2.2)
Whether or not you enable the "Group by material"
option inside Luuv doesn't seem to make a big difference; the different
materials will still get listed inside UVMapper. The difference I can
see is how the groups and materials will be listed in UVMapper (whether
or not they will be split up according to material inside the Select by
Group window or not).
|
|
|
|
Figure 2.2
|
|
Copy texture files
If you use image files for the textures of your object you can choose
whether or not you want to save those image files in the same place where
you're going to save your .obj file. Procedural textures will not be
exported, since they are program specific. (But they will still be listed
as different materials inside UVMapper.)
Import options
Preserve groups
Whether or not you want to preserve the groups of your object when
importing depends on how you intend to use it inside trueSpace. If you
are importing a character to make a clothing item for it, it's best to
import with the groups preserved. This way, you can easily select and
delete unnecessary parts. For example, if you are modeling a skirt, you
could delete the head, arms, chest, etc of the character object. Also, when setting up the
groups for exporting the clothing item, it will be easier to see which
part of the clothing should go with which body part of the character for conforming.
However, if you are importing a character to place in a scene and render
in trueSpace, you might not want to import with the groups preserved.
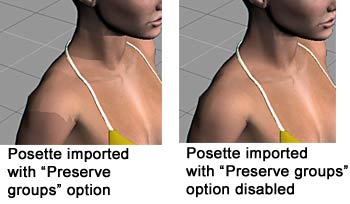
The reason for this is the following: It seems that when you import a
character with the groups preserved, the texture of the different parts
might look slightly different. (Figure 2.3)
|
|
|
|
Figure 2.3
|
Autoscale
When you import an .obj file from Poser, it's very, very small in the
trueSpace scene. You can enable the Autoscale option to automatically
make the object bigger when importing. In some cases, however, you might
want to uncheck this option and do the scaling yourself. For example, if
you are bringing in a character to build a clothing item around and you
intend to export this clothing item to use in Poser, it's better to
uncheck the Autoscale option. Then, once your object is in the scene,
open the Object Info panel and scale your object manually. To do this,
go to the Size row and multiply the x, y, and z values by the same
amount (the easiest is to multiply them by 10, e.g. x*10). You can enter
mathematical equations in each field and tS will calculate the amount.
(Figure 2.4) Then, when you are ready to export your clothing item, just
divide the x, y, and z sizes by the same number (e.g. x/10). When you import your
clothing item into Poser, uncheck all options and the size should be
just right.
|
|

|
|
Figure 2.4
|
Scale factor
If you enable the autoscaling, you can set the scale factor in the
options window. This is a good solution if you are going to use the
imported object inside trueSpace and you are not going to export the
mesh or the mesh built around this object. The autoscaling is based on
the biggest dimension and its aim is to make the object a good size to
work with, but it does not scale the object by multiplying each
dimension by the same amount (e.g. by 10). If you need to do the scaling
that way, it's better to scale manually (see previous example).
Autofacet angle
The autofacet angle will determine how smooth the model will look
inside trueSpace. You can adjust it here before importing the model, or
later within the Material Editor. (Right-click on the Autofacet icon
within the Material Editor to bring up the Autofacet control.) A value
of 80-120 seems to give good results.
Ambient factor
You can set the material ambient factor before importing the object.
If you leave the value at 0, then the ambience value will remain how it
was set up in the originating program. If you change this number in the
options window before importing (to a number between 0 and
1), then this new value will override the original value.
Specular factor
Similar to the ambient factor, but for specularity: if you
leave the value at 0, then the original specularity setting will remain;
if you change the value, then this new specularity setting will be
applied to the object upon importing.
Miscellaneous - Show warnings
Luuv needs to have the textures in the same folder as the .obj file.
If you import an object without the textures being in the same folder,
the plug-in will warn you about the missing textures. (Figure 2.5) Just
click OK. You can also disable the warnings and then the warning dialogs
will not be shown.
|
|

|
|
Figure 2.5 |
Help
Click on Help to learn more about the plug-in.
|