|
|
|
|
|
|
UV mapping with trueSpace and UVMapper ProPage 5
|
|
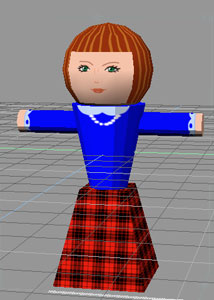
Back to trueSpace:So, let's see how things are looking inside trueSpace now. 1. Import the UV mapped object with the luuv plug-in. 2. Open up the Material Editor, find the texture you've just made, and apply it to the object. Ta da! The texture fits perfectly. See Figure 21. And that's it! We've UV mapped and textured an object. If you have trueSpace version 6 or higher, and you want to see how you can do some UV editing in tS, read on. Otherwise, you're done! |
|
Figure 21 |
|
|
Working on the UVs inside trueSpace
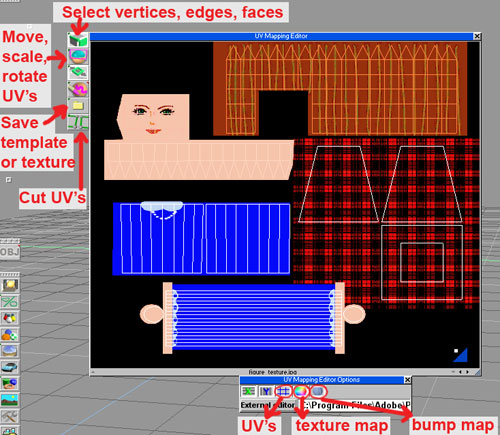
In trueSpace version 6 and higher you can do some UV editing inside the program, too. Let's see how: 1. Select your object, then open up the UV Mapping Editor 2. If you right-click on the UV Mapping Editor's icon in the toolbar, you'll open up the options for the tool. Here you can turn the visibility of the UV template, the texture, and the bump map on and off. 3. Inside the UV Mapping Editor, you can select vertices, edges, or faces, and move, scale and rotate them. You can also cut the UVs so that you can move them around. You can also save the the UV map or the texture into a file. If you want to save the UV map, then turn off the visibility of the texture and the bump map. If you want to save the texture map, turn off the other two channels, etc.
|
|

|
|
Figure 22 |
|
|
4. So, if you don't have UVMapper Pro, just UVMapper Classic, you
could do the initial mapping inside UVMapper, then save the UV mapped
object, import it into tS, and adjust the UVs here. You can apply a
checker texture to the object, then open up the UV Mapping Editor, and
move and scale the UVs until the checker texture is square and even
everywhere. I have found that it's best to use a texture file for this.
If I applied the "wrapped checker" procedural texture to my object, it
seemed to mess up the UV Mapping Editor: I could no longer see all the
UVs at once. You could make your own checker texture like this (see
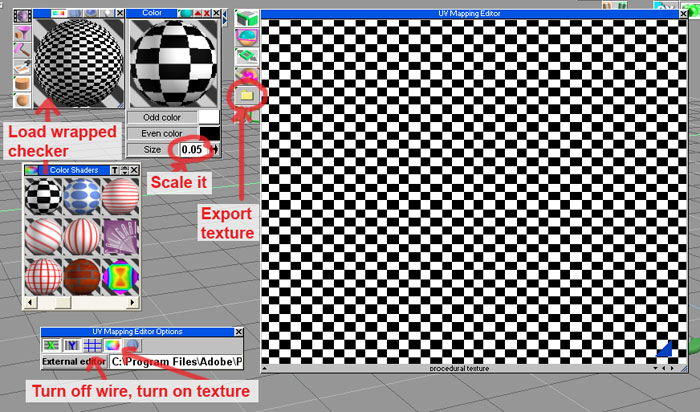
Figure 23): - Load the wrapped checker procedural texture and apply it to your object. Decrease the size so that it will have more repeats. - Open up the UV Mapping Editor with the object selected. In the options, turn off the wireframe and turn on the texture. - Save out the texture (Export bitmap icon by the left side of the UV Mapping Editor). - Now load the checker file you have just saved and apply it to your object. I'm including a checker texture made this way in the download files.
|
|
|
|
|
Figure 23 |
|
|
Now you can adjust the UVs in the UV Mapping Editor while watching the checker texture on the object. Then save the UV map (this time, turn off the texture and turn on the wireframe display in the UV Mapper Editor), open it up in your paint program, paint the texture, then load it in trueSpace and apply it to your object. You can also adjust the UVs once the texture map is done and applied to your object, if necessary. For example, if you find that there's some stretching in the texture somewhere, just open up the UV Mapping Editor and adjust the UVs until the stretching is fixed. I hope this tutorial was helpful. If you have any comments or questions, send me an e-mail at Sue3d@render-lab.com
|
|
|
|
|
|
Copyright © 2002-2012 by Susan Lee. |
|


 .
You can see our UV map and texture in the editor. See Figure 22.