|
|
|
|
|
|
Tutorials |
|
Duplicating Objects along a CurvePage 1 |
|
|
When you want to duplicate an object and have all the duplicates positioned, scaled and rotated the same amount, you can use the Edit / Duplicate menu and set the number of duplicates, their translation, rotation and scale attributes in the Duplicate Options window. For example, let's make a simple staircase this way: |
|
|
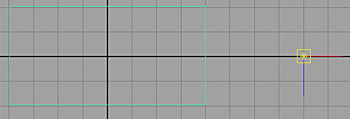
1. Create a polygon cube and scale it 8 units in X, 1 in Y, and 4 in Z. 2. Click on the Rotate tool, then hit the Insert key on your keyboard to access the pivot point. Go to the top view, and move the pivot point about 4 units to the right from the edge of the cube. (See Figure 1.) Then hit the Q key to get out of the pivot (and rotate) mode. The farther you move the pivot point from the cube the bigger the radius of the curve that the steps will follow. |
|
Figure 1
|
|
|
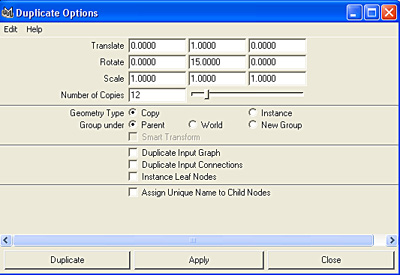
3. With the cube selected, go to Edit / Duplicate --> options box and
set Translate Y to 1, Rotate Y to 15 and the Number of Copies to 12. See Figure 2. Click Duplicate.
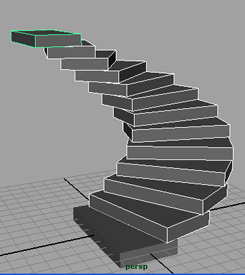
4. Check out the cool staircase you've just created. (Fig. 3)
|
|
|
|
Figure 2 |
Figure 3
|
|
But how can you duplicate objects in such a way that they are not translated and rotated the same amount, like following a curve? There's an interesting way of doing that, using some animation tools. |
|
|
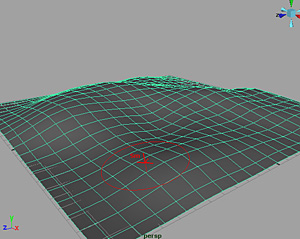
Let's see how we can put a fence on a rolling hillside. 1. Start a new scene. 2. Create a polygon plane (width = 25, height = 25, subdivisions along width and height = 20) . 3. Go to Edit Polygons / Sculpt Geometry Tool -- options box, set the operation to pull, and set the brush size as big as you wish by either adjusting the radius values in the tool options, or holding down B on your keyboard and dragging in the viewport. 4. Sculpt a nice, hilly landscape. See Figure 4.
|
|
Figure 4 |
|
|
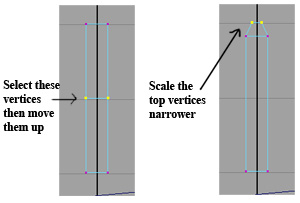
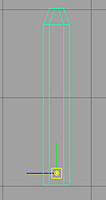
5. Hit the Q key on your keyboard to get out of the sculpt geometry tool, then go to Create / Polygon Primitives / Cube -- options box. Set the following options: Width = 0.3, Height = 2, Depth = 0.1, Subdivisions Along Width = 1, Subdivisions Along Height = 2, Subdivisions Along Depth = 1. 6. Go to the front view, then move the cube up so you can see it better. Select the vertices in the middle, then move them up higher. Select the top vertices and scale them down in the X axis. See Figure 5. This is going to be the first vertical board of the fence.
|
|
Figure 5 |
|
|
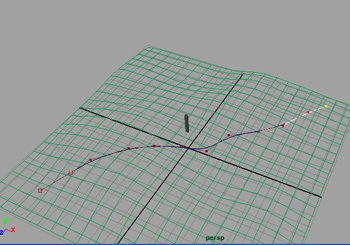
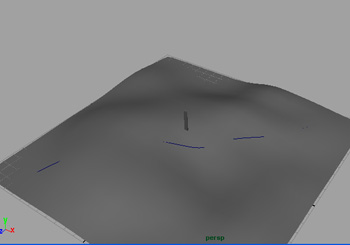
7. Now we need to draw a curve on the landscape that the slats (the vertical boards) will follow. Go to perspective view, select the plane, then go to Modify / Make Live. The poly plane will turn green and will be in wireframe mode. 8. Now go to Create / CV Curve Tool, then draw a curve on the polygon plane. See Figure 6. 9. When you're happy with the curve, hit Enter, then click in an empty area of the scene to deselect the curve, and go to Modify / Make Not Live. The plane turns back to its original state and the curve is drawn on its surface. See Figure 7.
|
|
|
|
|
Figure 6 |
Figure 7 |
|
10. Before we can duplicate the slat, we need to set a few things
up to get the best results. Go to top view, select the cube (the slat),
then move it to the start of the curve and rotate it so that its Z axis (the
narrow side) lines up with the direction of the curve. See Figure
8.
11. Now go to the side view, and move the pivot point down towards the bottom of the cube (hit the Insert key, move the pivot point down, then hit Insert again). This will ensure that in the next step the object will not be positioned halfway in the ground, since its pivot point will be lower, and not in the middle. Do not move the pivot point all the way to the bottom though - we want the fence to sink into the ground a bit. See Figure 9. |
|
|
|
|
Figure 8 |
Figure 9 |
|
11. Okay, so let's duplicate that slat. Select it, then
SHIFT-select the curve, then go to the Animation menu set, Animate /
Motion Paths / Attach to Motion Path -- options box. In the options, if we left
Follow enabled, the slats would tilt this way and that, following the
normals of the polygon plane, which is not what we want. So uncheck Follow. Click Attach, then play the animation to see the
slat following the
curve on the plane.
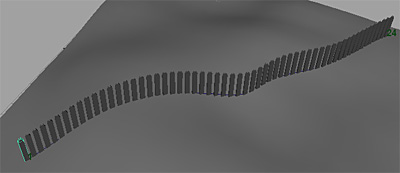
12. Go back to the first frame, and, with the cube selected, go to Animate / Create Animation Snapshot -- options box. Move the options box window so that you can see the scene beside it. For the Time Range, choose Time Slider. Leave the Increment at 1 (this will put one cube on the curve at each frame), then click on Apply. Check your scene - the slats are too far apart. Go to Edit / Undo, without closing the options box. We'll leave it open and keep experimenting until we get to an Increment setting we like. Let's try 0.5. This will put two pieces on the curve at each frame. Better, but maybe they could still be a little closer. So, undo again, then try 0.4 for the Increment value and click Apply. I think this looks pretty good (experiment more if you wish), so close the window. As you can see, the original slat has been duplicated along the curve. See Figure 10.
|
|
|
|
|
Figure 10 |
|
|
|
|
|
Copyright © 2002-2012 by Susan Lee. |
|