|
|
|
|
|
|
Using UV Sets and Layered TexturesPage 2 |
|
|
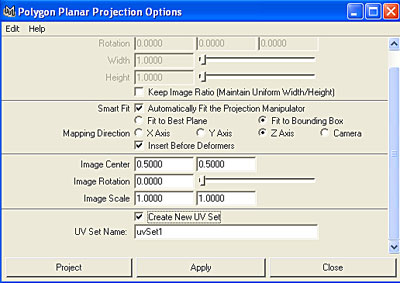
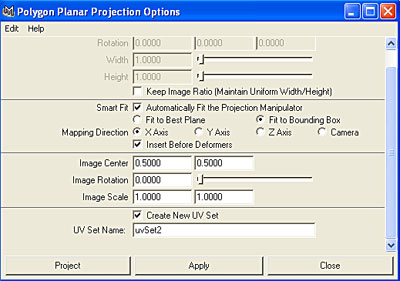
16. Okay, now that we have our base UV map, we can turn our attention to making the new UV sets. Let's say we want different dirt maps on the front and the side of the cube. So, let's select the front face and make a new UV projection for it: Polygon UVs / Planar Mapping -- options box. Select Z axis and enable Create New UV Set. Click Project. See figure 6. 17. Now select the side face, and project a planar UV map on the X axis. Be sure to give a new name to the new UV set. See figure 7.
|
|
|
|
|
Figure 6 |
Figure 7 |
|
18. If you go to Image / UV Sets inside the UV Texture Editor, you will see that now we have 3 UV sets: map1, uvSet1 and uvSet2. Since only map1 has a texture file assigned to it (the checker texture if you followed the first page of the tutorial), that's the only texture you can see displayed in the perspective view and in the UV Texture Editor. 19. Let's make the layered texture now. Load a new material in the Hypershade (Window / Rendering Editors / Hypershade). I chose another lambert. 20. In the Attribute Editor, click on the checker box icon by the Color channel to bring up the Create Render Node window. Scroll down to Other Textures and click on Layered Texture.
|
|
|
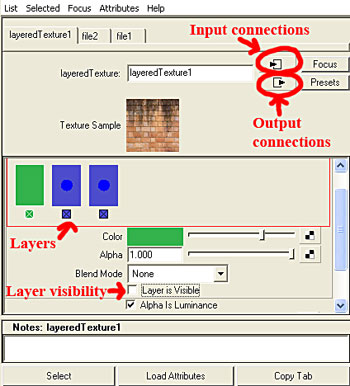
21. The Layered Texture Attributes pop up in the Attribute Editor, with the first layer already placed in. Since we are going to have 3 layers, click in the little window area two times to put in two more layers. 22. The layer on the right is the bottom layer, and the layers to the left of it are above this base layer. So, click on the rightmost layer to set up the base texture. Click on the checker box icon by the Color attribute, then click on File to load an image file. Navigate to the texture file you want to use and load it. Then go back to the Layered Texture Attributes panel by clicking on the output connections button. 23. Now click on the middle layer's icon in the Layered Texture Attributes panel to access its attributes. Load a dirt texture and an alpha map for this layer. Set the Blend Mode to Multiply (or whatever works for you). If you want to see how it's looking so far in the Texture Sample window, click on the top layer and uncheck Layer is Visible. Since we haven't set up the textures for that layer yet, it's obscuring how our layered texture is looking so far. By turning off the visibility of this layer, you can fine-tune the other two and see a preview of the results. (Fig. 8)
|
|
Figure 8 |
|
|
24. When you're happy with the first two layers, turn off the visibility on the second one and turn it on for the top layer (the one on the left). Now load your texture and alpha maps for this layer, and set the blend mode as you wish. When you're done with all the layers, don't forget to enable visibility for all of them. 25. Now that we're done setting up the layered texture, let's assign it to our cube. Select the cube, open up the Hypershade, right-click on the lambert material with the layered texture, and select Assign Material to Selection. To better see the texture on the cube, go to the lambert material's attributes, scroll down to Hardware Texturing, open up this section, then choose the highest texture resolution setting.
|
|
|
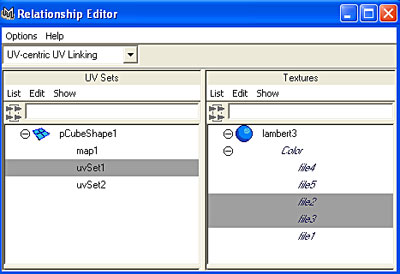
26. Now we can assign each texture layer to a different UV set. Select the cube, then go to Window / Relationship Editors / UV Linking / UV-Centric. If you click on map1 (the basic UV map), you can see that all the texture layers are assigned to it, which is not what we want. 27. Select uvSet1 on the left side - this is the UV set for the front of the cube. I want to assign the middle layer to this UV set, and the middle layer has the files file2 and file3. So, click on file2 and file3 on the right side. 28. Select uvSet2 on the left side - this is the UV set for the side of the cube. This UV set should have the third, top layer assigned to it, so select file4 and file5 on the right side. If you click on map1, you can see that now only the bottom layer with file1 is assigned to it.
|
|
Figure 9 |
|
|
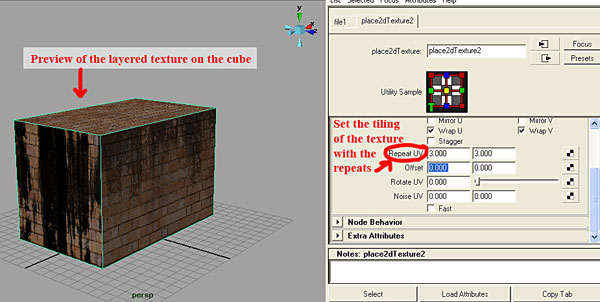
29. Close the Relationship Editor and open up the UV Texture Editor. If you go to Image / UV Sets, and choose the different UV sets, the image files connected to the different UV sets will display in the Editor. If you go to Image / Selected Images, you can see the selected texture displayed on the object one texture at a time. If you want the base texture to tile with more repeats on the cube, go to the layered texture attributes, select the file1 tab, then click on the input connection button to open up the place2dTexture node for that file. Change the Repeat U and Repeat V values as desired. See figure 10.
|
|
|
|
|
Figure 10 |
|
|
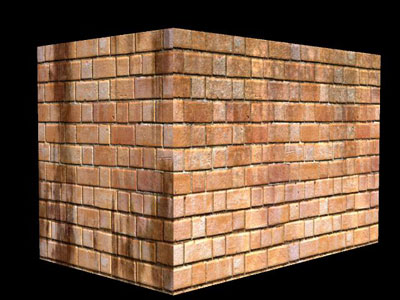
Do a render and check out your work! The base texture (in my case, a brick texture) is displayed uniformly over the whole object, but the dirt textures are different on the front and the side. (Fig. 11)
|
|
|
|
|
Figure 11 |
|
|
If you want to change how the dirt textures look on your object, you
can go to the UV Texture Editor, select the UV set you want to work on,
select the UVs and move/scale them around.
I hope this helped; if you have any questions, comments, or suggestions, please contact me at Sue3d@render-lab.com |
|
|
|
|
|
Copyright © 2002-2012 by Susan Lee. |
|

