Using the PolyTools plug-ins
Page 2
Page 1
|
On this page:
 Scissors
Tool Scissors
Tool  Knife
Knife  Divide Loop
  Select Loop
  Magnet
  Tessellate
 UnTessellate
  Flip Edge
  Grow Selection
 Select Adjacent
 Search
Poly Search
Poly
|
|
With this tool you can select edges on an object and split the
vertices, so then you can separate the faces. To separate the faces,
select the vertices or faces you want to move, then move them. Again,
you'll get holes in your object which you might not want. If after the
separation you have two objects (like in the first example in the
manual), then you can easily fix the holes (if you want) by adding faces
to those areas with the  Add Face tool. Also, in this case you can click on the
  Decompose into Objects tool and then you'll get a hierarchy of the two
objects (i.e. you'll get two objects which have been grouped). This way
you can easily select the two different parts and manipulate them
separately.
Decompose into Objects tool and then you'll get a hierarchy of the two
objects (i.e. you'll get two objects which have been grouped). This way
you can easily select the two different parts and manipulate them
separately.
You might also be able to fix the hole in your mesh even if you
didn't separate it into two objects, depending on how the mesh is. In
the following example I selected some edges on a sphere, used the
Scissors tool on them, then moved these edges down. Then I used the Add
Edges tool to add an edge from one end of the hole to the other (I had
to move to the opposite side of the object to see the second vertex
highlight). This actually added one face, I just had to add another one
with the Add Face tool.
|

|
|
You can either add edges to an object or divide an object with
this tool. To use the tool, first select your object, then click on the
Knife tool. Next, click with the tool to one side of your object, and
then move the cursor to the other side of the object and click. Wherever
the line fell as you moved your cursor, you'll get edges added to your
object. Right-click on the tool to open up the Options
window. |
 |
|
If you have Knife enabled and nothing else, you will have edges added to
your object only on the sides that are visible in the viewport. To have
the new edges go all around the object, enable the Backside option. If
you select some faces on your object before using the knife tool, then
the edges will only be added to those faces.
To divide your object, click on the Divide object button in the
options window. If you don't enable any of the options under the Divide
object heading, or if you enable New group, you will have two new,
ungrouped objects after cutting your object with the knife. If you
enable the Grouped option instead of New group, then after cutting the
object you will have a hierarchy of two objects grouped together. If you
enable Physical attributes, then the divided objects will keep the
physical attributes assigned to the original object (if there were
physical attributes assigned).
You can add edge loops with this tool. If you select adjacent faces
and then click this tool, it will put in a new edge loop going through
the middle of the selected faces. The tool does not work on faces which
have more than 4 sides.
You can select edge loops or face loops very easily with this tool.
To select an edge loop, select your object, select an edge, then click
on the Select Loop tool. It will select all the edges of the edge loop
that the initially selected edge belongs to. If you want to select a
loop of faces, then select an edge, then right-click on the Select Loop
tool. (See manual.)
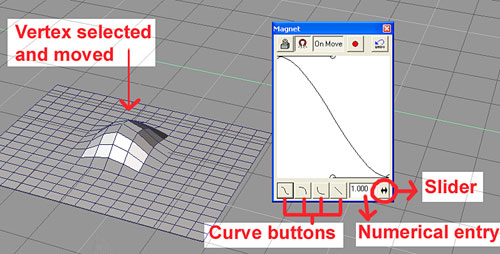
This is a great tool for deforming objects exactly where you want
them. To use this tool:
1. Select your object and right-click on it to go into point edit
mode.
2. Select a vertex or a group of vertices that you will want to move
with the magnet.
3. Click on the Magnet tool. This will bring up its control window.
Make sure that the On Move button is depressed; this will let you see
the deformation as you work on it.
4. Depress the  magnet icon and start moving the selected component(s). You can change
the shape and range of the deformation in real time by clicking on the
different curve buttons and by adjusting the slider or entering
different values in the numerical entry box. The curves let you change
the shape of the deformation while the numerical entry and the slider
let you change the range of the deformation (i.e. how much of the
surface is being affected by the deformation). You can also change the
curves yourself by dragging the handles.
magnet icon and start moving the selected component(s). You can change
the shape and range of the deformation in real time by clicking on the
different curve buttons and by adjusting the slider or entering
different values in the numerical entry box. The curves let you change
the shape of the deformation while the numerical entry and the slider
let you change the range of the deformation (i.e. how much of the
surface is being affected by the deformation). You can also change the
curves yourself by dragging the handles.
|
 |
|
|
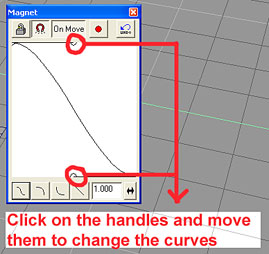
If you want to limit the area that the deformation will influence, do
the following:
1. Select the vertices in the area that you want deformed.
2. Click on the Magnet tool and in the control window, depress the  lock icon and the magnet
icon.
lock icon and the magnet
icon.
3. Select one vertex only in the middle of the area to be deformed,
enable  Point Move in the point edit panel and start moving the vertex. Change
the curves and ranges as desired.
Point Move in the point edit panel and start moving the vertex. Change
the curves and ranges as desired.
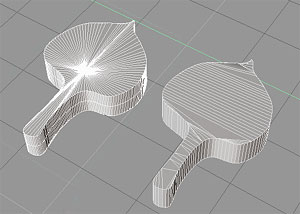
This tool is great for dealing with n-gons (polygons with more than 4
sides). With this tool, you can select the polygon, right -click on the
Tessellate icon and choose if you want triangles or quads on those
faces. Then click the tool's icon and it will tessellate your polygon
the way you want. You might still have to put in some edges manually,
but it's still a big improvement over the default tS quad divide tool,
which would just triangulate the polygon.
|
 |
|
On the left: the trueSpace Quad Divide tool used on a
swept curve. On the right: the same swept curve after using the
Tessellate tool on it with the Quadrilatera option enabled.
|
|
This tool is for de-triangulating your mesh. Right-click on the
tool's icon to open its options window. Here you can set the angle of
the faces that will get untessellated with the tool. You can also click
on the eyedropper tool, then click on a face of the mesh and this will
sample the angle of the face you want to de-triangulate, so you don't
have to guess. After setting the options, click the tool.
Select the edge you want flipped, then click on this tool.
Right-click or click on the Object Tool to exit the tool and get your
newly flipped edge.
Select a vertex, edge, or face on your object, then click this tool.
You can also select a group of vertices, edges or faces. The tool
selects all the surrounding vertices, edges or faces.
Select a vertex, edge, or face on your object, then click this tool.
The tool selects those vertices, edges, or faces which are right next to
the component you selected, but deselects the originally selected
component. You can also select a group of vertices, edges or faces.
This is very useful for finding problem areas in your mesh. To use
it, select the object, then click on this tool. In its options panel,
select what kind of polygons you want to find, then click on the Search
button, and the tool will highlight the kind of polygons you are looking
for if there are any. The options:
- Triangle: triangles
- Quadrilateral: quads (polygons with 4 sides)
- n corner forms: n-gons (polygons with more than 4 vertices)
- Unplane: polygons which are not flat
- Complex: I think this means n-gons which are not flat
Well, I guess that's it! I hope this was helpful. If you have any
comments, corrections, or if you can add anything, etc., please
contact me at:
Sue3d@render-lab.com
|
Back to Top
Previous

|
